Analog Feedback Servos
Created by Bill Earl
https://learn.adafruit.com/analog-feedback-servos
Last updated on 2021-11-15 06:03:37 PM EST
©Adafruit Industries
Page 1 of 15
�Table of Contents
About Servos and Feedback
3
• What is a Servo?
• Open and Closed Loops
3
3
Using Feedback
5
•
•
•
•
•
Reading the feedback
Calibrating the feedback
Using feedback in your code
Seeking to a position
Finding out where you are
7
7
8
8
8
Servos as Input Devices
9
• To run the Servo Record/Play Demo Sketch:
12
Using With CircuitPython
12
• Wiring
• Reading the feedback
12
13
Calibrating The Feedback
13
Finding and Seeking
14
©Adafruit Industries
Page 2 of 15
�About Servos and Feedback
What is a Servo?
The word 'servo' means more than just those little RC Servo Motors we usually think
of. Servo is a general term for a closed loop control system using negative feedback.
The cruise control in a car is one example of a servo system. It measures your speed
and feeds that back into a control circuit which adjusts the accelerator to maintain
speed.
For the familiar RC Servo motor, the position of the output shaft is measured and fed
back to the internal control circuit which adjusts current to the motor to maintain
position.
Open and Closed Loops
An "Open Loop" system has no feedback, so there is no way to verify that it is
performing as expected. A common expression among control engineers is "You can't
control what you can't measure.".
©Adafruit Industries
Page 3 of 15
�A "Closed Loop" system can use the feedback signal to adjust the speed and
direction of the motor to achieve the desired result. In the case of an RC servo motor,
the feedback is in the form of a potentiometer (pot) connected to the output shaft of
the motor. The output of the pot is proportional to the position of the servo shaft.
The problem with controlling a standard RC servo motor from a microcontroller is that
it is 'closed loop' inside the servo motor case, but 'open loop' with respect to your
microcontroller. You can tell the servo control circuit how you want the shaft
positioned, but you have no way to confirm if or when this actually happens.
©Adafruit Industries
Page 4 of 15
�The Feedback Servos allow you to close this outer loop by providing the feedback
signal to the microcontroller too!
Using Feedback
If a servo motor does what it is told to do, why do we need feedback?
RC servos usually do what they are told to do, but there are many cases where a
servo motor might not. These can include:
• Insufficient motor size
• Insufficient power supply
• Physical interference
• Electrical interference
• loose connection
In these cases, feedback could alert you to the problem.
But even if the servo is adequately sized and functioning normally, it still takes some
time to respond to a position command, and in many applications it is just as
©Adafruit Industries
Page 5 of 15
�important to know when the position is reached.
This following code snippet is from the "Sweep" example in the Servo library. Note the
arbitrary 15 millisecond delay after
"myservo.write(val)".
void loop()
{
val = analogRead(potpin);
(value between 0 and 1023)
val = map(val, 0, 1023, 0, 179);
between 0 and 180)
myservo.write(val);
scaled value
delay(15);
}
// reads the value of the potentiometer
// scale it to use it with the servo (value
// sets the servo position according to the
// waits for the servo to get there
Without feedback, most servo programming has to make some assumptions about
how long a particular move will take. Adding fixed-time delays to servo code works
OK for simple applications, but can result in slow and/or jerky performance when
trying to coordinate multiple servo motions or interactions between servos and other
sensors or actuators.
Or worse: If the delays are not long enough, your servos may not reach the desired
position in time. This can cause malfunctions and/or damage to your project. Timing
problems are a big problem in battery-powered projects because the motors will run
slower as the battery power fades.
©Adafruit Industries
Page 6 of 15
�Reading the feedback
The feedback signal is tapped off the position pot attached to the servo shaft. You
can connect the white feedback wire to any of the analog input pins and read the
feedback value using analogRead().
int feedback = analogRead(feedbackPin);
Calibrating the feedback
The raw feedback signal is a voltage. In order to convert that voltage into a
meaningful position, we need to calibrate it to the servo. By reading the feedback
values at two known positions, we can interpolate the expected feedback values for
every position in between.
The following bit of code does just that. If you call "calibrate" in your setup function, it
will perform the calibration on the two points you specify. These servos operate over
a range of about 0 to 180 degrees. For maximum accuracy, you should choose the
minPos and maxPos calibration points based on the range of motion required in your
project.
#include <Servo.h>
Servo myservo;
// Control and feedback pins
int servoPin = 9;
int feedbackPin = A0;
// Calibration values
int minDegrees;
int maxDegrees;
int minFeedback;
int maxFeedback;
int tolerance = 2; // max feedback measurement error
/*
This function establishes the feedback values for 2 positions of the servo.
With this information, we can interpolate feedback values for intermediate
positions
*/
void calibrate(Servo servo, int analogPin, int minPos, int maxPos)
{
// Move to the minimum position and record the feedback value
servo.write(minPos);
minDegrees = minPos;
delay(2000); // make sure it has time to get there and settle
minFeedback = analogRead(analogPin);
// Move to the maximum position and record the feedback value
servo.write(maxPos);
maxDegrees = maxPos;
delay(2000); // make sure it has time to get there and settle
maxFeedback = analogRead(analogPin);
}
©Adafruit Industries
Page 7 of 15
�void setup()
{
myservo.attach(servoPin);
calibrate(myservo, feedbackPin, 20, 160);
range
}
// calibrate for the 20-160 degree
void loop()
{
}
Using feedback in your code
Now that we have a calibrated feedback signal, we can easily convert between servo
position and feedback voltages in our code.
Seeking to a position
The following bit of code will seek to a position and return as soon as we reach it.
There is no need to add an arbitrary delay to the code because the feedback signal
will tell us exactly when we get there!
void Seek(Servo servo, int analogPin, int pos)
{
// Start the move...
servo.write(pos);
// Calculate the target feedback value for the final position
int target = map(pos, minDegrees, maxDegrees, minFeedback, maxFeedback);
// Wait until it reaches the target
while(abs(analogRead(analogPin) - target) > tolerance){} // wait...
}
Finding out where you are
Another great thing about feedback is: You don't need to write code to remember the
last position command you sent to the servo (assuming it got there). If you want to
find out what position your servo is in, you can simply ask it!
Once you have calibrated your servo with the calibration function above, this bit of
code will tell you the current position (in degrees) of your servo:
int getPos(int analogPin)
{
return map(analogRead(analogPin), minFeedback, maxFeedback, minDegrees,
maxDegrees);
}
©Adafruit Industries
Page 8 of 15
�The ability to simply read the servo position opens up the possibility of using it as an
input device as well. The next page will show you how.
Servos as Input Devices
Another neat feature of feedback servos is that they can be used as an input device
too! The Servo Record/Play Demo lets you record a series of servo movements, then
it will replay them back for you! The recorded positions are saved in EEPROM, so they
will be remembered even after resetting or powering down the Arduino
To run this demo, first wire up your Servo as in the Fritzing diagram below:
Components used:
• Arduino Uno (http://adafru.it/50)
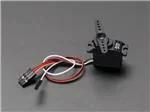
• Feedback Servo (http://adafru.it/1404)
• 2x pushbuttons (http://adafru.it/1119)
• LED (http://adafru.it/299)(most any 3 or 5mm led will work)
• 220 ohm resistor
• Misc. jumpers (http://adafru.it/758)
• Breadboard (http://adafru.it/64)
©Adafruit Industries
Page 9 of 15
�Next, download the example sketch from Github using this button:
// Example code for recording and playing back servo motion with a
// analog feedback servo
// http://www.adafruit.com/products/1404
#include
#include
#define CALIB_MAX 512
#define CALIB_MIN 100
#define SAMPLE_DELAY 25 // in ms, 50ms seems good
uint8_t
uint8_t
uint8_t
uint8_t
uint8_t
recordButtonPin = 12;
playButtonPin = 7;
servoPin = 9;
feedbackPin = A0;
ledPin = 13;
Servo myServo;
void setup() {
Serial.begin(9600);
pinMode(recordButtonPin, INPUT);
digitalWrite(recordButtonPin, HIGH);
pinMode(playButtonPin, INPUT);
digitalWrite(playButtonPin, HIGH);
pinMode(ledPin, OUTPUT);
Serial.println("Servo RecordPlay");
}
void loop() {
if (! digitalRead(recordButtonPin)) {
delay(10);
// wait for released
while (! digitalRead(recordButtonPin));
delay(20);
// OK released!
recordServo(servoPin, feedbackPin, recordButtonPin);
}
©Adafruit Industries
Page 10 of 15
�if (! digitalRead(playButtonPin)) {
delay(10);
// wait for released
while (! digitalRead(playButtonPin));
delay(20);
// OK released!
playServo(servoPin, playButtonPin);
}
}
void playServo(uint8_t servoPin, uint8_t buttonPin) {
uint16_t addr = 0;
Serial.println("Playing");
myServo.attach(servoPin);
while (digitalRead(buttonPin)) {
uint8_t x = EEPROM.read(addr);
Serial.print("Read EE: "); Serial.print(x);
if (x == 255) break;
// map to 0-180 degrees
x = map(x, 0, 254, 0, 180);
Serial.print(" -> "); Serial.println(x);
myServo.write(x);
delay(SAMPLE_DELAY);
addr++;
if (addr == 512) break;
}
Serial.println("Done");
myServo.detach();
delay(250);
}
void recordServo(uint8_t servoPin, uint8_t analogPin, uint8_t buttonPin) {
uint16_t addr = 0;
Serial.println("Recording");
digitalWrite(ledPin, HIGH);
pinMode(analogPin, INPUT);
while (digitalRead(buttonPin)) {
uint16_t a = analogRead(analogPin);
Serial.print("Read analog: "); Serial.print(a);
if (a < CALIB_MIN) a = CALIB_MIN;
if (a > CALIB_MAX) a = CALIB_MAX;
a = map(a, CALIB_MIN, CALIB_MAX, 0, 254);
Serial.print(" -> "); Serial.println(a);
EEPROM.write(addr, a);
addr++;
if (addr == 512) break;
delay(SAMPLE_DELAY);
}
if (addr != 512) EEPROM.write(addr, 255);
digitalWrite(ledPin, LOW);
Serial.println("Done");
delay(250);
}
©Adafruit Industries
Page 11 of 15
�To run the Servo Record/Play Demo Sketch:
1. Upload servo_recordplay to the arduino
2. press the top button to start recording. (The LED should light up.)
3. Press the top button once more to stop recording.
4. Press the bottom button to replay.
5. You can press the green button as many times as you want.
6. To record a new sequence, go back to step 2.
Watch the video below to see it in operation:
You can record up to 512 samples (about 12.8 seconds worth). When you reach
the limit, the led will go out and recording will stop automatically.
Using With CircuitPython
All of the general discussion from the previous sections still apply. Here we simply
provide CircuitPython (https://adafru.it/cpy-welcome) versions of the Arduino
examples.
For the basics on using servos with CircuitPython, checkout the information in the
Essentials guide:
CircuitPython Servo
https://adafru.it/DOf
Wiring
The example codes are based on the wiring shown below.
• RED wire to USB
• BLACK wire to GND
• ORANGE signal wire to A1
• WHITE feedback wire to A5
©Adafruit Industries
Page 12 of 15
�Reading the feedback
The basic mechanism is the same as before - simply connect the feedback to an
analog input and read the value. To learn more about reading analog inputs, see the
Essentials guide:
CircuitPython Analog In
https://adafru.it/Bep
All that is needed is to setup an analog input and get its value.
FEEDBACK_PIN = board.A5
feedback = AnalogIn(FEEDBACK_PIN)
position = feedback.value
The examples that follow will show this in more detail.
Calibrating The Feedback
You can use the program below to help determine the feedback values that
correspond to your servo's range of motion.
If you want to calibrate over a difference range of motion, you can change these lines
at the top:
©Adafruit Industries
Page 13 of 15
�# Calibration setup
ANGLE_MIN = 0
ANGLE_MAX = 180
When the code runs, it will print out the analog reading values that correspond to the
min/max range of motion. Write these values down, you'll need them to calibrate the
other programs.
# Example code for calibrating analog feedback values to servo range
import time
import board
import pwmio
from adafruit_motor import servo
from analogio import AnalogIn
# Pin setup
SERVO_PIN = board.A1
FEEDBACK_PIN = board.A5
# Calibration setup
ANGLE_MIN = 0
ANGLE_MAX = 180
# Setup servo
pwm = pwmio.PWMOut(SERVO_PIN, duty_cycle=2 ** 15, frequency=50)
servo = servo.Servo(pwm)
servo.angle = None
# Setup feedback
feedback = AnalogIn(FEEDBACK_PIN)
print("Servo feedback calibration.")
# Move to MIN angle
print("Moving to {}...".format(ANGLE_MIN), end="")
servo.angle = ANGLE_MIN
time.sleep(2)
print("Done.")
feedback_min = feedback.value
# Move to MAX angle
print("Moving to {}...".format(ANGLE_MAX), end="")
servo.angle = ANGLE_MAX
time.sleep(2)
print("Done.")
feedback_max = feedback.value
# Print results
print("Feedback MIN = {}".format(feedback_min))
print("Feedback MAX = {}".format(feedback_max))
# Deactivate servo
servo.angle = None
Finding and Seeking
This example shows how to find the current position and use that to "seek" to a
specific angle. Be sure to run the calibration program first and change these lines at
the top of the code with your servo's values.
©Adafruit Industries
Page 14 of 15
�# Calibration setup
CALIB_MIN = 18112
CALIB_MAX = 49408
If you calibrated over a different range of angles, also change those lines to match.
# Example code for using analog feedback value to seek a position
import board
import pwmio
from simpleio import map_range
from adafruit_motor import servo
from analogio import AnalogIn
# Demo angles
angles = [0, 180, 0, 45, 180]
# Pin setup
SERVO_PIN = board.A1
FEEDBACK_PIN = board.A5
# Calibration setup
CALIB_MIN = 18112
CALIB_MAX = 49408
ANGLE_MIN = 0
ANGLE_MAX = 180
# Setup servo
pwm = pwmio.PWMOut(SERVO_PIN, duty_cycle=2 ** 15, frequency=50)
servo = servo.Servo(pwm)
servo.angle = None
# Setup feedback
feedback = AnalogIn(FEEDBACK_PIN)
def get_position():
return map_range(feedback.value, CALIB_MIN, CALIB_MAX, ANGLE_MIN, ANGLE_MAX)
def seek_position(position, tolerance=2):
servo.angle = position
while abs(get_position() - position) > tolerance:
pass
print("Servo feedback seek example.")
for angle in angles:
print("Moving to {}...".format(angle), end="")
seek_position(angle)
print("Done.")
©Adafruit Industries
Page 15 of 15
�


 工商网监
湘ICP备2023018690号
工商网监
湘ICP备2023018690号
