Adafruit CRICKIT HAT for Raspberry Pi Linux Computers
Created by lady ada
Last updated on 2018-12-26 07:12:44 PM UTC
�Guide Contents
Guide Contents
Overview
2
6
5V 2A (2000mA) switching power supply - UL Listed
9
Update Your Crickit
10
Step 1. Plug in USB cable into seesaw/Crickit
10
Step 2. Double-click the Crickit Reset button
Step 3. Look for pulsing yellow LED and green NeoPixel
Step 4. Look for a New Disk on Your Computer
Step 5. Download the latest firmware
Step 6. Drag UF2 file onto CRICKITBOOT
Powering Crickit
How to Power your Crickit
Plug In DC Power Supplies
10
11
12
12
12
14
14
15
5V 2A (2000mA) switching power supply - UL Listed
5V 4A (4000mA) switching power supply - UL Listed
15
15
AA Battery Packs
15
4 x AA Battery Packs for NiMH ONLY
15
4 x AA Battery Holder with On/Off Switch
16
3 x AA Battery Packs for Alkaline ONLY
16
3 x AA Battery Holder with 2.1mm Plug
Waterproof 3xAA Battery Holder with On/Off Switch
Male DC Power adapter - 2.1mm plug to screw terminal block
16
16
17
Not Recommended Power supplies
Speaker Output
Raspberry Pi Setup
Fast Install
Detailed Install
17
18
19
19
21
Update /etc/modprobe.d (if it exists)
Disable headphone audio (if it's set)
Create asound.conf file
Add Device Tree Overlay
21
22
23
25
Raspberry Pi Test
Speaker Tests!
27
27
Simple white noise speaker test
Simple WAV speaker test
Simple MP3 speaker test
27
27
27
Volume adjustment
Play Audio with PyGame
I2S Audio FAQ
27
29
30
Hey in Raspbian Pixel desktop, the speaker icon is X'd out!
Even with dmixer enabled, I get a staticy-pop when the Pi first boots or when it first starts playing audio
The audio on my DAC sounds really bad/distorted
Does this work with my favorite software?
Python Installation
© Adafruit Industries
30
30
30
30
31
https://learn.adafruit.com/adafruit-crickit-hat-for-raspberry-pi-linux-computers
Page 2 of 87
�Install Adafruit-Blinka, Enable I2C
Power off & Install HAT
Install Crickit library
CircuitPython Servos
Test Servos
Control Servo
35
More Servos!
Min/Max Pulse control
Continuous Rotation Servos
Disconnecting Servos or Custom Pulses
CircuitPython Drives
Test Drive
Set PWM Frequency
Control Drive Output
35
36
37
37
39
40
41
41
More Drivers!
CircuitPython DC Motors
Import Libraries
Control Motor
41
43
44
45
CircuitPython Steppers
Bi-Polar or Uni-Polar Motor Port
Uni-Polar Only Drive Port
CircuitPython Signals
Digital Pin Modes
Digital Read
Digital Write
Analog Reads
CircuitPython Touch
CircuitPython NeoPixels
Crickit and Circuit Playground Express
Crickit and the Crickit FeatherWing
Crickit for micro:bit
For More Information
Python Docs
Recommended Motors
DC Gearbox Motors
DC Gearbox Motor - "TT Motor" - 200RPM - 3 to 6VDC
Orange and Clear TT Motor Wheel for TT DC Gearbox Motor
Thin White Wheel for TT DC Gearbox Motors - 65mm Diameter
Skinny Wheel for TT DC Gearbox Motors
Servo-style DC motor
DC Motor in Micro Servo Body
Wheel for Micro Continuous Rotation FS90R Servo
Non-Geared DC Motor
DC Toy / Hobby Motor - 130 Size
© Adafruit Industries
31
31
32
34
34
https://learn.adafruit.com/adafruit-crickit-hat-for-raspberry-pi-linux-computers
46
47
49
52
54
55
55
55
57
60
61
62
63
63
65
66
66
66
66
66
67
67
67
67
67
68
Page 3 of 87
�Recommended Chassis
Mini Round Robot Chassis Kit - 2WD with DC Motors
Mini 3-Layer Round Robot Chassis Kit - 2WD with DC Motors
Mini Robot Rover Chassis Kit - 2WD with DC Motors
Recommended Servos
Servo Extensions
Servo Extension Cable - 30cm / 12" long Servo Extension Cable - 50cm / 19.5" long
Popular plastic-gear servos
Standard servo - TowerPro SG-5010
Micro servo
Continuous Rotation Servos
Continuous Rotation Servo
Continuous Rotation Servo Wheel
Continuous Rotation Micro Servo
Wheel for Micro Continuous Rotation FS90R Servo
High Torque Servos
69
69
69
70
70
70
71
71
71
71
71
72
72
72
73
73
Standard Size - High Torque - Metal Gear Servo
Micro Servo - High Powered, High Torque Metal Gear
Micro Servo - MG90D High Torque Metal Gear
Recommended Speakers
4Ω Speakers
Mono Enclosed Speaker - 3W 4 Ohm
Speaker - 3" Diameter - 4 Ohm 3 Watt
8Ω Speakers
73
73
74
75
75
75
75
75
Speaker - 3" Diameter - 8 Ohm 1 Watt
Mini Metal Speaker w/ Wires - 8 ohm 0.5W
Thin Plastic Speaker w/Wires - 8 ohm 0.25W
Wall or Bone Transducers
Medium Surface Transducer with Wires - 4 Ohm 3 Watt
Bone Conductor Transducer with Wires - 8 Ohm 1 Watt
Recommended Drives
Solenoids
Mini Push-Pull Solenoid - 5V
Vibration Motors
76
76
76
76
77
77
78
78
78
78
Vibrating Mini Motor Disc
Recommended Capacitive Touch
Small Alligator Clip Test Lead (set of 12)
Small Alligator Clip to Male Jumper Wire Bundle - 6 Pieces
Copper Foil Tape with Conductive Adhesive - 6mm x 15 meter roll
Copper Foil Tape with Conductive Adhesive - 25mm x 15 meter roll
Bare Conductive Paint Pen - 10mL
Bare Conductive Paint - 50mL
Hacks & Upgrades
Brown Outs?
78
79
79
79
79
80
80
80
81
81
4700uF 10v Electrolytic Capacitor
F.A.Q.
© Adafruit Industries
69
81
82
https://learn.adafruit.com/adafruit-crickit-hat-for-raspberry-pi-linux-computers
Page 4 of 87
�Why did you misspell "Cricket"?
82
Troubleshooting Crickit
83
My Crickit Is Doing Something Wrong
My Crickit Motors Aren't Moving!
My Crickit Keeps Resetting, It Works For a Bit... Then Fails!
HELP! My Crickit isn't working in MakeCode, and in Python I see a message "No I2C Device at Address: 49"
Python: No Pullups found on SDL and SCL
micro:bit Crickit does not work
Downloads
Files
Datasheets
Circuit Playground Crickit Schematics
Crickit HAT Schematics
© Adafruit Industries
https://learn.adafruit.com/adafruit-crickit-hat-for-raspberry-pi-linux-computers
83
83
83
83
84
84
85
85
85
85
86
Page 5 of 87
�Overview
Sometimes we wonder if robotics engineers ever watch movies. If they did, they'd know that making robots into slaves
always ends up in a robot rebellion. Why even go down that path? Here at Adafruit, we believe in making robots
our friends!
So if you find yourself wanting a companion, consider the robot. They're fun to program, and you can get creative with
decorations.
With that in mind, we designed the Adafruit Crickit HAT - That's our Creative Robotics & Interactive Construction Kit.
It's an add-on to the Raspberry Pi (https://adafru.it/ejq) that lets you #MakeRobotFriend using Python!
© Adafruit Industries
https://learn.adafruit.com/adafruit-crickit-hat-for-raspberry-pi-linux-computers
Page 6 of 87
�Plug the Crickit HAT onto your Pi using the standard 2x20 GPIO connector and start controlling motors, servos,
solenoids. You also get 8 signal pins with analog inputs or PWM outputs, capacitive touch sensors, a level-shifted
NeoPixel driver and 3W amplified speaker output from the I2S port. It complements & extends your Pi, doing all the
things a Pi can't do, so you can still use all the goodies on the Pi like video, camera, Internet, bluetooth... but now you
have a robotics playground as well.
Control of the motors, sensors, NeoPixels, capacitive touch, etc. is all done in Python 3. It's the easiest and best way to
program your Pi, and after a couple pip installs you'll be ready to go. Audio is handled by the Pi's built in audio system,
so anything that plays audio will come out the speaker - that includes Python commands or any application with sound.
© Adafruit Industries
https://learn.adafruit.com/adafruit-crickit-hat-for-raspberry-pi-linux-computers
Page 7 of 87
�The Crickit HAT is powered by seesaw, our I2C-to-whatever bridge firmware. So you only need to use two data pins to
control the huge number of inputs and outputs on the Crickit. All those timers, PWMs, NeoPixels, sensors are
offloaded to the co-processor.
You get:
4 x Analog or Digital Servo control, with precision 16-bit timers
2 x Bi-directional brushed DC motor control, 1 Amp current limited each, with 8-bit PWM speed control (or one
stepper)
4 x High current "Darlington" 500mA drive outputs with kick-back diode protection. For solenoids, relays, large
LEDs, or one uni-polar stepper
4 x Capacitive touch input sensors with alligator-pads
8 x Signal pins, can be used as digital in/out or analog inputs
1 x NeoPixel driver with 5V level shifter - this is connected to the seesaw chip, not the Raspberry Pi, so you won't
be giving up pin 18. It can drive over 100 pixels.
1 x Class D, 4-8 ohm speaker, 3W-max audio amplifier - this is connected to the I2S pins on the Raspberry Pi for
high quality digital audio. Works on any Pi, even Zero's that don't have an audio jack!
Built-in USB to serial converter. The USB port on the HAT can be used to update the seesaw firmware on the
Crickit, or you can plug into your computer, it will also act as a USB converter for logging into the console and
running command lines on the Pi.
All are powered via 5V DC, so you can use any 5V-powered servos, DC motors, steppers, solenoids, relays etc. To
keep things simple and safe, we don't support mixing voltages, so only 5V, not for use with 9V or 12V robotic
components.
Please note this board does not require any soldering but you will need a 5V power supply and a Raspberry Pi to go
along with the Crickit, and these are not included!
We recommend also purchasing:
© Adafruit Industries
https://learn.adafruit.com/adafruit-crickit-hat-for-raspberry-pi-linux-computers
Page 8 of 87
�Raspberry Pi, any kind with 2x20 connector will work (https://adafru.it/ejq)
5V 2A power supply (https://adafru.it/BzI)
If you're going to be running more than 2 large motors or servos at a time, we recommenda 5V 4A power
supply (https://adafru.it/e50)
5V 2A (2000mA) switching power supply - UL Listed
$7.95
IN STOCK
ADD TO CART
And of course we have a huge collection of all compatible motors, servos, solenoids, speakers and more in our Crickit
category (https://adafru.it/DkC)
Since you'll be working with high-current devices, we wanted to have a good solid power supply system that minimizes
risk of damage. The power supply has an 'eFuse' management chip (https://adafru.it/Bfj) that will automatically turn off if
the voltage goes above 5.5V or below 3V and has over-current protection at 4A. Every motor driver has kick-back
protection. We think this is a nice and durable board for robotics!
© Adafruit Industries
https://learn.adafruit.com/adafruit-crickit-hat-for-raspberry-pi-linux-computers
Page 9 of 87
�Update Your Crickit
Your Crickit contains a special interface chip we call seesaw. Like a see-saw you see in a playground, it goes up/down
back/forth. In this case, instead of holding children, it sends commands and responses back and forth - motor
movement, sensors inputs, signal i/o...
The seesaw code is contained in a microcontroller near the bottom of the Crickit, and that chip comes with the seesaw
firmware on it already when you get it!
But we do make improvements to the seesaw firmware, fix bugs, and improve performance
So its a good idea to update your Crickit when you get it! It's easy and only takes a few seconds.
Step 1. Plug in USB cable into seesaw/Crickit
There's a little USB connector at the bottom of your Crickit labeled seesaw only! Plug a standard data-sync USB cable
into that port and into your computer. You do not need to plug in the DC power jack or power the
Feather/CircuitPlayground.
Do check that the switch on the Crickit is switched to ON
Step 2. Double-click the Crickit Reset button
© Adafruit Industries
https://learn.adafruit.com/adafruit-crickit-hat-for-raspberry-pi-linux-computers
Page 10 of 87
�On the Crickit for CPX, Feather or Micro:bit, this button is
next to the DC jack and is pretty large.
On the Raspberry Pi, its more compact, and is right
below the status NeoPixel
Step 3. Look for pulsing yellow LED and green NeoPixel
© Adafruit Industries
https://learn.adafruit.com/adafruit-crickit-hat-for-raspberry-pi-linux-computers
Page 11 of 87
�If you have a good USB connection and you doubleclick right, you'll see the left LED turn green and the
right hand little yellow LED start pulsing
Step 4. Look for a New Disk on Your Computer
You'll see a new disk drive on your computer called
CRICKITBOOT (short for crickit bootloader)
Step 5. Download the latest firmware
Click here to download the latest Crickit firmware. The filename ends in uf2
https://adafru.it/BMU
https://adafru.it/BMU
Step 6. Drag UF2 file onto CRICKITBOOT
© Adafruit Industries
https://learn.adafruit.com/adafruit-crickit-hat-for-raspberry-pi-linux-computers
Page 12 of 87
�Drag that file you downloaded onto the disk drive, after
it is completed the drive will disappear (you may get a
complaint from the operating system)
That's it! You're now updated
© Adafruit Industries
https://learn.adafruit.com/adafruit-crickit-hat-for-raspberry-pi-linux-computers
Page 13 of 87
�Powering Crickit
On the Crickit HAT, the 5V power plug is next to the
2x20 connector
The first thing you'll learn when making robots is that they use a lot of power. So making sure you have your power
supply all worked out is super important. We've tried to make the power supply as easy and safe as possible, so you
don't have to worry about damaging your electronics or robot. To do that we made some important design decisions.
How to Power your Crickit
It's really important to read and understand how to power your Crickit!
You MUST provide about 4-5 Volts DC power to the Crickit to power the servos, motors, solenoids, NeoPixels,
etc.
You CANNOT provide this power by plugging the Crickit, micro:bit, Feather, Raspberry Pi or Circuit Playground
into USB. Computer USB ports cannot provide the 2 Amp + required to drive robotics, LEDs, speakers...
Power to the Crickit is provided via the 2.1mm DC Jack only!
The Cricket has two LEDs to let you know how the power supply is doing. If you see the green LED next to the
smiley face, you're good to go. If you see the red LED next to the warning triangle, the voltage is too high, too
low or too much current is being drawn.
The Crickit power will also power the Circuit Playground Express, micro:bit, Raspberry Pi or Feather so you don't
need separate power for your microcontroller board (however, if you want to plug it into USB for programming,
that's totally OK too!)
© Adafruit Industries
https://learn.adafruit.com/adafruit-crickit-hat-for-raspberry-pi-linux-computers
Page 14 of 87
�Here's our recommended ways to power the Crickit:
Plug In DC Power Supplies
These get wall power and give you a nice clean 5V DC power option. 5V 2A works for most project with a motor or
two...
5V 2A (2000mA) switching power supply - UL Listed
$7.95
IN STOCK
ADD TO CART
And a 5V 4A supply will give you lots of power so you can drive 4 or more servos, motors, etc. Use this if you notice
you're running out of power with a 5V 2A adapter
5V 4A (4000mA) switching power supply - UL Listed
$14.95
IN STOCK
ADD TO CART
AA Battery Packs
On the go? Portable power is possible! Use AA battery packs.
The number of batteries you need depends on whether you are using Alkaline or NiMH rechargeables.
We recommend NiMH rechargeables. For one, they have less waste, but they also perform better than alkalines in
high-current draw robotics. So if you can, please use NiMH!
4 x AA Battery Packs for NiMH ONLY
NiMH batteries have a 1.3V max voltage, so 4 of them is 4 x 1.3 = 5.2 Volts. Perfect!
© Adafruit Industries
https://learn.adafruit.com/adafruit-crickit-hat-for-raspberry-pi-linux-computers
Page 15 of 87
�4 x AA Battery Holder with On/Off Switch
$2.95
IN STOCK
ADD TO CART
3 x AA Battery Packs for Alkaline ONLY
Alkaline batteries have a 1.5V max voltage, so 4 of them is 4 x 1.5 = 6 Volts. That's too high! Instead we recommend 3
in series for 3 x 1.5V = 4.5 VDC
3 x AA Battery Holder with 2.1mm Plug
$2.95
IN STOCK
ADD TO CART
If you're making a custom battery pack you may want to pick up a 2.1mm DC jack adapter, so you can connect battery
pack wires
Waterproof 3xAA Battery Holder with On/Off Switch
$3.95
IN STOCK
ADD TO CART
© Adafruit Industries
https://learn.adafruit.com/adafruit-crickit-hat-for-raspberry-pi-linux-computers
Page 16 of 87
�Male DC Power adapter - 2.1mm plug to screw terminal
block
$2.00
IN STOCK
ADD TO CART
Not Recommended Power supplies
LiPoly Batteries - 1 battery is 3.7V, too low. 2 batteries is 7.2V, too high! You could possibly use a 7.2V pack and
then a UBEC to step down to 5V (https://adafru.it/efD) but its not recommended
Lead Acid Batteries - These are heavy and you'll need a custom charging solution. You can probably get away
with a 2 x 2V cell pack, or a 3 x 2V cell pack and then add some 1N4001 diodes to drop the voltage, but it's for
advanced hacking!
USB Power Packs - In theory you can use a USB to 2.1mm DC power adapter (https://adafru.it/Bfm), but power
packs sometimes dislike the kinds of current draw that motors have (high current peaks for short amounts of
time) So experimentation is key!
© Adafruit Industries
https://learn.adafruit.com/adafruit-crickit-hat-for-raspberry-pi-linux-computers
Page 17 of 87
�Speaker Output
The Crickit HAT's speaker is run by a MAX98357 I2S amplifier, you can set it up by installing via our script on the next
page. It will appear as an everyday audio interface once that's done.
© Adafruit Industries
https://learn.adafruit.com/adafruit-crickit-hat-for-raspberry-pi-linux-computers
Page 18 of 87
�Raspberry Pi Setup
At this time, Raspbery Pi linux kernel does not support mono audio out of the I2S interface, you can only play
stereo, so any mono audio files may need conversion to stereo!
2017-11-2 Raspbian PIXEL ('full') has broken something in volume control. I2S works, but there's no software
volume setup, if you need this, try Raspbian Lite - will try to fix as soon as we figure out why :)
Fast Install
Luckily its quite easy to install support for I2S DACs on Raspbian.
These instructions are totally cribbed from the PhatDAC instructions at the lovely folks at
Pimoroni! (https://adafru.it/nFy)
Run the following from your Raspberry Pi with Internet connectivity:
curl -sS https://raw.githubusercontent.com/adafruit/Raspberry-Pi-Installer-Scripts/master/i2samp.sh | bash
We've added an extra helper systemd script that will play quiet audio when the I2S peripheral isn't in use. This
removes popping when playback starts or stops. It uses a tiny amount of CPU time (on a Pi Zero, 5%, on a Pi 2 or 3 its
negligible). You don't need this on RetroPie because it never releases the I2S device, but it's great for Raspbian.
© Adafruit Industries
https://learn.adafruit.com/adafruit-crickit-hat-for-raspberry-pi-linux-computers
Page 19 of 87
�You will need to reboot once installed.
You must reboot to enable the speaker hardware!
After rebooting, log back in and re-run the script again...It will ask you if you want to test the speaker. Say yes and
listen for audio to come out of your speakers...
If it sounds really distorted, it could be the volume is too high. However, in order to have volume control appear in
Raspbian desktop or Retropie you must reboot a second time after doing the speaker test, with sudo reboot
You must reboot *twice* to enable alsamixer volume (really!)
Once rebooted, try running alsamixer and use arrow keys to lower the volume, 50% is a good place to start.
If you're still having audio problems, try re-running the script and saying N (disable) the /dev/zero playback service .
You can then go to the next page on testing and optimizing your setup. Skip the rest of this page on Detailed
© Adafruit Industries
https://learn.adafruit.com/adafruit-crickit-hat-for-raspberry-pi-linux-computers
Page 20 of 87
�Installation if the script worked for you!
Detailed Install
If, for some reason, you can't just run the script and you want to go through the install by hand - here's all the steps!
Update /etc/modprobe.d (if it exists)
Log into your Pi and get into a serial console (either via a console cable, the TV console, RXVT, or what have you)
Edit the raspi blacklist with
sudo nano /etc/modprobe.d/raspi-blacklist.conf
If the file is empty, just skip this step
However, if you see the following lines:
blacklist i2c-bcm2708
blacklist snd-soc-pcm512x
blacklist snd-soc-wm8804
Update the lines by putting a # before each line
© Adafruit Industries
https://learn.adafruit.com/adafruit-crickit-hat-for-raspberry-pi-linux-computers
Page 21 of 87
�Save by typing Control-X Y
Disable headphone audio (if it's set)
Edit the raspi modules list with
sudo nano /etc/modules
If the file is empty, just skip this step
However, if you see the following line:
snd_bcm2835
Put a # in front of it
© Adafruit Industries
https://learn.adafruit.com/adafruit-crickit-hat-for-raspberry-pi-linux-computers
Page 22 of 87
�and save with Control-X Y
Create asound.conf file
Edit the raspi modules list with
sudo nano /etc/asound.conf
This file ought to be blank!
Copy and paste the following text into the file
© Adafruit Industries
https://learn.adafruit.com/adafruit-crickit-hat-for-raspberry-pi-linux-computers
Page 23 of 87
�pcm.speakerbonnet {
type hw card 0
}
pcm.dmixer {
type dmix
ipc_key 1024
ipc_perm 0666
slave {
pcm "speakerbonnet"
period_time 0
period_size 1024
buffer_size 8192
rate 44100
channels 2
}
}
ctl.dmixer {
type hw card 0
}
pcm.softvol {
type softvol
slave.pcm "dmixer"
control.name "PCM"
control.card 0
}
ctl.softvol {
type hw card 0
}
pcm.!default {
type
slave.pcm
}
© Adafruit Industries
plug
"softvol"
https://learn.adafruit.com/adafruit-crickit-hat-for-raspberry-pi-linux-computers
Page 24 of 87
�Save the file as usual
Add Device Tree Overlay
Edit your Pi configuration file with
sudo nano /boot/config.txt
And scroll down to the bottom. If you see a line that says: dtparam=audio=on
Disable it by putting a # in front.
Then add:
dtoverlay=hifiberry-dac
dtoverlay=i2s-mmap
© Adafruit Industries
https://learn.adafruit.com/adafruit-crickit-hat-for-raspberry-pi-linux-computers
Page 25 of 87
�on the next line. Save the file.
Reboot your Pi with sudo reboot
© Adafruit Industries
https://learn.adafruit.com/adafruit-crickit-hat-for-raspberry-pi-linux-computers
Page 26 of 87
�Raspberry Pi Test
Speaker Tests!
OK you can use whatever software you like to play audio but if you'd like to test the speaker output, here's some quick
commands that will let you verify your amp and speaker are working as they should!
Simple white noise speaker test
Run speaker-test -c2 to generate white noise out of the speaker, alternating left and right.
If you have a mono output amplifier, the I2S amp merges left and right channels, so you'll hear continuous white noise
Simple WAV speaker test
Once you've got something coming out, try to play an audio file with speaker-test (for WAV files, not MP3)
speaker-test -c2 --test=wav -w /usr/share/sounds/alsa/Front_Center.wav
You'll hear audio coming from left and right alternating speakers
Simple MP3 speaker test
If you want to play a stream of music, you can try
sudo apt-get install -y mpg123
mpg123 http://ice1.somafm.com/u80s-128-mp3
If you want to play MP3's on command, check out this tutorial which covers how to set that up (https://adafru.it/aTD)
At this time, Jessie Raspbery Pi kernel does not support mono audio out of the I2S interface, you can only play stereo,
so any mono audio files may need conversion to stereo!
Volume adjustment
Many programs like PyGame and Sonic Pi have volume control within the application. For other programs you can set
the volume using the command line tool called alsamixer. Just type alsamixer in and then use the up/down arrows to
set the volume. Press Escape once its set
© Adafruit Industries
https://learn.adafruit.com/adafruit-crickit-hat-for-raspberry-pi-linux-computers
Page 27 of 87
�In Raspbian PIXEL you can set the volume using the menu item control. If it has an X through it, try restarting the Pi
(you have to restart twice after install to get PIXEL to recognize the volume control
© Adafruit Industries
https://learn.adafruit.com/adafruit-crickit-hat-for-raspberry-pi-linux-computers
Page 28 of 87
�Play Audio with PyGame
© Adafruit Industries
https://learn.adafruit.com/adafruit-crickit-hat-for-raspberry-pi-linux-computers
Page 29 of 87
�I2S Audio FAQ
Hey in Raspbian Pixel desktop, the speaker icon is X'd out!
Try rebooting once after playing some audio. Also make sure you have our latest alsa configuration (check the
detailed install page on the Raspberry Pi Setup page for the /etc/asound.conf !
If its still not working, you can still change the volume, just use alsamixer from a Terminal command prompt.
Even with dmixer enabled, I get a staticy-pop when the Pi first boots or when it first starts playing audio
Yep, this is a known Raspbian Linux thing. Yay Linux! We don't have a fix for it. If it makes you feel better, my fancy
Windows development computer does the same thing with my desktop speakers.
You can reduce popping a lot with the '/dev/zero play' option in the i2s setup script. (We added it in October 2018)
but you still might get that one initial pop
The audio on my DAC sounds really bad/distorted
Make sure you've lowered the volume. The default is 100% which is waaaay too high! Use alsamixer to reduce the
volume to 50% or so
Does this work with my favorite software?
It will work with anything that has alsa audio support. There's thousands of linux programs so we can't guarantee all
of them will work but here's what we found does for sure!
PyGame - see our page on playing audio with PyGame for example code. Volume can be controlled within
pygame
mpg123 - command line mp3 audio playback. use alsamixer to control the volume
aplay - for playing wav files on the command line
Sonic Pi - tested in the Pixel Desktop. Use the Sonic Pi settings panel to change the volume - it does not seem
to care about what global audio volume you set!
Scratch 2 - tested in the Pixel Desktop. Works fine but may have a delay and make a popping sound the first
time you play audio. You can set volume with alsamixer and also via the app by using the set volume to nn%
block
Scratch 1 - doesn't work, something not set up with Scratch 1 to use alsa?
RetroPie/Emulation Station - audio works within games (we tested NES and MAME libretro) but does not work
in the 'main screen' (selecting which game to play interface)
© Adafruit Industries
https://learn.adafruit.com/adafruit-crickit-hat-for-raspberry-pi-linux-computers
Page 30 of 87
�Python Installation
Before you begin you'll need to have a fully set up Raspberry Pi computer with internet connectivity.
You can use any Raspberry Pi computer with a 2x20 connector such as a Pi 3, Pi 2, Pi A+, Zero or Zero W, etc.
Install Adafruit-Blinka, Enable I2C
We have a full guide on installing Adafruit-Blinka and enabling I2C, including CircuitPython tests. The short instructions
are below:
Update OS to latest with:
sudo apt-get update
sudo apt-get upgrade
sudo reboot
Enable I2C following this guide. Don't forget to reboot afterwards (https://adafru.it/dEO).
Make sure you are running Python3. Python2 is installed on many Linux computers, but Python3 is required!
sudo apt-get install -y python3 git python3-pip
sudo update-alternatives --install /usr/bin/python python /usr/bin/python2.7 1
sudo update-alternatives --install /usr/bin/python python /usr/bin/python3.5 2
sudo update-alternatives --config python
Then install the needed CRICKIT Python 3 libraries with
pip3 install RPI.GPIO adafruit-blinka
Power off & Install HAT
Shutdown the Pi safely with sudo shutdown -h now and
install the HAT as shown. There's an extra long header
standoff that goes between the Pi headers and the HAT.
Make sure they are lined up correctly - Plugging in the
HAT wrong can damage your Pi permanently!
Start the pi up again and open a terminal window if you boot to graphics mode.
On the command line, install I2C tools so you get the detect program with sudo apt-get install -y i2c-tools
© Adafruit Industries
https://learn.adafruit.com/adafruit-crickit-hat-for-raspberry-pi-linux-computers
Page 31 of 87
�Now scan for I2C to see that the Crickit is found with i2cdetect -y 1
If you get an error Error: Could not open file `/dev/i2c-1' or `/dev/i2c/1': No such file or directory - Enable I2C following this
guide. Don't forget to reboot afterwards (https://adafru.it/dEO).
Note that you should be able to see the i2c address 0x49 appear even if the power switch on the HAT is off, or if no
power is plugged into the DC jack.
If the i2c address doesn't appear, try clicking the reset
button on the HAT once, to reset it, and try again.
Install Crickit library
We will use our Crickit library to make easy work of motors and sensor readings, install it with
pip3 install adafruit-circuitpython-crickit
© Adafruit Industries
https://learn.adafruit.com/adafruit-crickit-hat-for-raspberry-pi-linux-computers
Page 32 of 87
�You can test that your software installed properly by running Python 3 and entering these commands
from adafruit_crickit import crickit
print(crickit.touch_1.value)
print(crickit.touch_1.value)
Between the second and third command, touch your
finger to the first Capacitive Touch pad on the HAT.
If the value changes like in the screen shot below, it's
working!
© Adafruit Industries
https://learn.adafruit.com/adafruit-crickit-hat-for-raspberry-pi-linux-computers
Page 33 of 87
�CircuitPython Servos
To the left are the connections for the Crickit with the
Circuit Playground Express.
Note: The black wire on the servo connectors always
points inward towards the microcontroller and center of
Crickit. The light wire: yellow, orange, white, etc. faces
outward from the Crickit.
Here is the Feather Crickit connected to four servos.
The Crickit HAT for Raspberry Pi can also control up to 4
servos like other Crickit boards. Note the location of the
Servo header block with 4 rows of three male pins.
Test Servos
© Adafruit Industries
https://learn.adafruit.com/adafruit-crickit-hat-for-raspberry-pi-linux-computers
Page 34 of 87
�Lets start by controlling some servos. You'll want at least one servo to plug in and test out the servo code. Visit our
recommended servo page to check that you have a servo that works (https://adafru.it/Bfo). Once you do, plug in a
servo into SERVO #1 spot, making sure the yellow or white wire is next to the 1 text label.
This example will show rotating one servo from 0 to 180 degrees with a stop at 90 degrees.
import time
from adafruit_crickit import crickit
print("1 Servo demo!")
while True:
print("Moving servo #1")
crickit.servo_1.angle = 0
time.sleep(1)
crickit.servo_1.angle = 90
time.sleep(1)
crickit.servo_1.angle = 180
time.sleep(1)
crickit.servo_1.angle = 90
time.sleep(1)
# and repeat!
# right
# middle
# left
# middle
Are your servos not moving a full 180 degrees? Don't fret! This is normal, see below about min/max pulse
lengths to 'tune' your servo!
We start by importing the libraries that we need to have time delays ( import time ) and then the main crickit python
library that will make it super easy to talk to the motors and sensors on crickit ( from adafruit_crickit import crickit )
The crickit object represents the motors and servos available for control. The servos are available on the sub-objects
named servo_1 , servo_2 , servo_3 , servo_4
Each of these are adafruit_motor.servo (https://adafru.it/BMX) type objects for the curious
Control Servo
Now that we know the servo objects, we can simply assign the angle! crickit.servo_1.angle = 0 is all the way to the
left, crickit.servo_1.angle = 90 is in the middle, and crickit.servo_1.angle = 180 is all the way to the right. You'll want to test
this to ensure it works with your specific servo, as 0 might be to the right and 180 to the left if it was geared differently.
More Servos!
OK that was fun but you want MORE servos right? You can control up to four!
© Adafruit Industries
https://learn.adafruit.com/adafruit-crickit-hat-for-raspberry-pi-linux-computers
Page 35 of 87
�import time
from adafruit_crickit import crickit
print("4 Servo demo!")
# make a list of all the servos
servos = (crickit.servo_1, crickit.servo_2, crickit.servo_3, crickit.servo_4)
while True:
# Repeat for all 4 servos
for my_servo in servos:
# Do the wave!
print("Moving servo #",
my_servo.angle = 0
time.sleep(0.25)
my_servo.angle = 90
time.sleep(0.25)
my_servo.angle = 180
time.sleep(0.25)
my_servo.angle = 90
time.sleep(0.25)
my_servo.angle = 0
servos.index(my_servo)+1)
# right
# middle
# left
# middle
# right
This example is similar to the 1 servo example, but instead of accessing the crickit.servo_1 object directly, we'll make a
list called servos that contains 4 servo objects with
servos = (crickit.servo_1, crickit.servo_2, crickit.servo_3, crickit.servo_4)
Then we can access the individual using servo[0].angle = 90 or iterate through them as we do in the loop. You don't
have to do it this way, but its very compact and doesn't take a lot of code lines to create all 4 servos at once!
One thing to watch for is that if you use a list like this, servo[0] is the name of the Servo #1 and servo[3] is
Servo #4!
Min/Max Pulse control
Originally servos were defined to use 1.0 millisecond to 2.0 millisecond pulses, at 50 Hz to set the 0 and 180 degree
locations. However, as more companies started making servos they changed the pulse ranges to 0.5ms to 2.5ms or
even bigger ranges. So, not all servos have their full range at thoe 'standard' pulse widths. You can easily tweak your
code to change the min and max pulse widths, which will let your servo turn more left and right. But don't set the
widths too small/large or you can hit the hard stops of the servo which could damage it, so try tweaking the numbers
slowly until you get a sense of what the limits are for your motor.
All you need to do is add a line at the top of your code like this
crickit.servo_1.set_pulse_width_range(min_pulse=500, max_pulse=2500)
The above is for Crickit Servo #1, you'll need to duplicate and adjust for all other servos, but that way you can
customize the range uniquely per servo!
Here we've change the minimum pulse from the default ~750 microseconds to 500, and the default maximum pulse
from 2250 microseconds to 2500. Again, each servo differs. Some experimentation may be required!
© Adafruit Industries
https://learn.adafruit.com/adafruit-crickit-hat-for-raspberry-pi-linux-computers
Page 36 of 87
�import time
from adafruit_crickit import crickit
print("1 Servo demo with custom pulse widths!")
crickit.servo_1.set_pulse_width_range(min_pulse=500, max_pulse=2500)
while True:
print("Moving servo #1")
crickit.servo_1.angle = 0
time.sleep(1)
crickit.servo_1.angle = 180
time.sleep(1)
# right
# left
Continuous Rotation Servos
If you're using continuous servos, you can use the angle assignments and just remember that 0 is rotating one way, 90
is 'stopped' and 180 and rotating the other way. Or, better yet, you can use the crickit.continuous_servo_1 object instead
of the plain servo_1
Again, you get up to 4 servos. You can mix 'plain' and 'continuous' servos
import time
from adafruit_crickit import crickit
print("1 Continuous Servo demo!")
while True:
crickit.continuous_servo_1.throttle
time.sleep(2)
crickit.continuous_servo_1.throttle
time.sleep(2)
crickit.continuous_servo_1.throttle
time.sleep(2)
crickit.continuous_servo_1.throttle
time.sleep(2)
crickit.continuous_servo_1.throttle
time.sleep(2)
crickit.continuous_servo_1.throttle
time.sleep(2)
= 1.0 # Forwards
= 0.5 # Forwards halfspeed
= 0
# Stop
= -0.5 # Backwards halfspeed
= -1 # Forwards
= 0
# Stop
If your continuous servo doesn't stop once the loop is finished you may need to tune the min_pulse and max_pulse
timings so that the center makes the servo stop. Or check if the servo has a center-adjustment screw you can tweak.
Disconnecting Servos or Custom Pulses
If you want to 'disconnect' the Servo by sending it 0-length pulses, you can do that by 'reaching in' and adjusting the
underlying PWM duty cycle with:
crickit.servo_1._pwm_out.duty_cycle = 0
or
crickit.servo_1._pwm_out.fraction = 0
© Adafruit Industries
https://learn.adafruit.com/adafruit-crickit-hat-for-raspberry-pi-linux-computers
Page 37 of 87
�Likewise you can set the duty cycle to a custom value with
crickit.servo_1._pwm_out.duty_cycle = number
where number is between 0 (off) and 65535 (fully on). For example, setting it to 32767 will be 50% duty cycle, at the
50 Hz update rate
Or you can use fractions like crickit.servo_1._pwm_out.fraction = 0.5
import time
from adafruit_crickit import crickit
print("1 Servo release demo!")
while True:
print("Moving servo #1")
crickit.servo_1.angle = 0
# right
time.sleep(10)
print("Released")
crickit.servo_1._pwm_out.duty_cycle = 0
time.sleep(10)
# and repeat!
© Adafruit Industries
https://learn.adafruit.com/adafruit-crickit-hat-for-raspberry-pi-linux-computers
Page 38 of 87
�CircuitPython Drives
The Crickit with Circuit Playground Express is shown at
left.
All the red wires connect to the Drives 5V terminal and
the other wire connected to individual Drive terminals.
Using Drives with the Feather-based Crickit is shown at
left.
Note: For CircuitPython, you need to use a
CircuitPython-compatible Feather board.
Crickit HAT for Raspberry Pi can also drive four devices
via the Drive ports.
Test Drive
© Adafruit Industries
https://learn.adafruit.com/adafruit-crickit-hat-for-raspberry-pi-linux-computers
Page 39 of 87
�Lets start by controlling a drive output. You'll need to plug something into the 5V and DRIVE1 terminal blocks. I'm just
using a simple LED with resistor but anything that can be powered by 5V will work.
Note that the drive outputs cannot have 5V output so you must connect the positive pin of whatever you're
driving to 5V. Don't try connecting the positive pin to the drive, and the negative pin to GND, it wont work!
Drive outputs are PWM-able!
This example will show turning the drive output fully on and off once a second:
import time
from adafruit_crickit import crickit
print("1 Drive demo!")
crickit.drive_1.frequency = 1000
while True:
crickit.drive_1.fraction = 1.0
time.sleep(0.5)
crickit.drive_1.fraction = 0.0
time.sleep(0.5)
crickit.drive_1.fraction = 0.5
time.sleep(0.5)
# and repeat!
# all the way on
# all the way off
# half on/off
We start by importing the libraries that we need to have time delays ( import time ) and then the main crickit python
library that will make it super easy to talk to the motors and sensors on crickit ( from adafruit_crickit import crickit )
The crickit object represents the drive outputs available for control. The drives are available on the sub-objects named
drive_1 , drive_2 , drive_3 , drive_4
Set PWM Frequency
Drive outputs are all PWM outputs too, so not only can they turn fully on and off, but you can also set it half-way on. In
general, the default frequency for PWM outputs on seesaw is 1000 Hz, so set the frequency to 1 KHz with
crickit.drive_1.frequency = 1000 . Even if you aren't planning to use the PWM output, please set the frequency!
Note that all the Drive outputs share the same timer so if you set the frequency for one, it will be the same for all of
them.
Control Drive Output
Now that we have a drive pwm object, we can simply assign the PWM duty cycle with the fraction property!
crickit.drive_1.fraction = 0.0 turns the output completely off (no drive to ground, no current draw).
crickit.drive_1.fraction = 1.0 turns the output completely on (fully drive to ground)
And, not surprisingly crickit.drive_1.fraction = 0.5 sets it to 1/2 on and 1/2 off at the PWM frequency set above.
More Drivers!
OK that was fun but you want MORE drives right? You can control up to four!
© Adafruit Industries
https://learn.adafruit.com/adafruit-crickit-hat-for-raspberry-pi-linux-computers
Page 40 of 87
�import time
from adafruit_crickit import crickit
print("4 Drive demo!")
drives = (crickit.drive_1, crickit.drive_2, crickit.drive_3, crickit.drive_4)
for drive in drives:
drive.frequency = 1000
while True:
for drive in drives:
print("Drive #", drives.index(drive)+1)
drive.fraction = 1.0 # all the way on
time.sleep(0.25)
drive.fraction = 0.0 # all the way off
time.sleep(0.25)
# and repeat!
This example is similar to the 1 drive example, but instead of accessing the crickit.drive_1 object directly, we'll make a
list called drives that contains 4 drive objects with
drives = (crickit.drive_1, crickit.drive_2, crickit.drive_3, crickit.drive_4)
Then we can access the individual using drives[0].fraction = 0.5 or iterate through them as we do in the loop. You don't
have to do it this way, but its very compact and doesn't take a lot of code lines to create all 4 drives at once!
© Adafruit Industries
https://learn.adafruit.com/adafruit-crickit-hat-for-raspberry-pi-linux-computers
Page 41 of 87
�CircuitPython DC Motors
Connections from DC motors to the Circuit Playground
Express Crickit is shown at left. There are two Motor
drivers, labeled 1 and 2.
The center GND terminal is not used for most DC Motor
applications.
The Feather Crickit connections for the Motor terminals
is shown at left.
Motors are just as easy to use with the Crickit HAT for
Raspberry Pi as other versions of Crickit.
You can drive two separate DC motors, so lets go ahead and get right to it!
© Adafruit Industries
https://learn.adafruit.com/adafruit-crickit-hat-for-raspberry-pi-linux-computers
Page 42 of 87
�DC motors are controlled by 4 PWM output pins, the 4 PWM pins let you control speed and direction. And we'll use our
adafruit_motor library to help us manage the throttle (speed) and direction for us, making it very easy to control motors
Note that each DC motor is a little different, so just because you have two at the same throttle does not mean they'll
rotate at the exact same speed! Some tweaking may be required
The two wires of the DC motor can be plugged in either way into each Crickit Motor port. If the motor spins
the opposite way from what you want to call 'forward', just flip the wires!
import time
from adafruit_crickit import crickit
print("Dual motor demo!")
# make two variables for the motors to make code shorter to type
motor_1 = crickit.dc_motor_1
motor_2 = crickit.dc_motor_2
while True:
motor_1.throttle = 1 # full speed forward
motor_2.throttle = -1 # full speed backward
time.sleep(1)
motor_1.throttle = 0.5 # half speed forward
motor_2.throttle = -0.5 # half speed backward
time.sleep(1)
motor_1.throttle = 0
motor_2.throttle = 0
time.sleep(1)
# stopped
# also stopped
motor_1.throttle = -0.5
motor_2.throttle = 0.5
time.sleep(1)
motor_1.throttle = -1
motor_2.throttle = 1
time.sleep(1)
motor_1.throttle = 0
motor_2.throttle = 0
time.sleep(0.5)
# half speed backward
# half speed forward
# full speed backward
# full speed forward
# stopped
# also stopped
# and repeat!
Import Libraries
We start by importing the libraries that we need to have time delays ( import time ) and then the main crickit python
library that will make it super easy to talk to the motors and sensors on crickit ( from adafruit_crickit import crickit )
The crickit object represents the motors and servos available for control. The motors are available on the sub-objects
named dc_motor_1 and dc_motor_2
© Adafruit Industries
https://learn.adafruit.com/adafruit-crickit-hat-for-raspberry-pi-linux-computers
Page 43 of 87
�Each of these are adafruit_motor.motor (https://adafru.it/BNE) type objects for the curious
To make our code easier to read, we'll make new names for each motor:
# make two variables for the motors to make code shorter to type
motor_1 = crickit.dc_motor_1
motor_2 = crickit.dc_motor_2
Control Motor
Now that we have our motor objects, we can simply assign the throttle, this will set the direction and speed. For
example, to set the speed to full forward, use motor_1.throttle = 1 and to set to full speed backward use motor_1.throttle
= -1 . For speeds in between, use a fraction, such as 0.5 (half speed) or 0.25 (quarter speed). Setting the throttle = 0
will stop the motor.
© Adafruit Industries
https://learn.adafruit.com/adafruit-crickit-hat-for-raspberry-pi-linux-computers
Page 44 of 87
�CircuitPython Steppers
Connecting Crickit with Circuit Playground Express with
stepper motors is shown at left.
The Crickit with Feather uses identical connections with
other Crickit boards to stepper motors.
Note the Fritzing part for the blue stepper has changed
wire order but the color connections shown are
identical.
Likewise you can drive two stepper motors with the
Crickit HAT for Raspberry Pi. One on the Motor ports,
one on the Drive ports.
The coding for each port is a bit different but the
functionality is the same.
The Drive stepper must be Unipolar - bipolar steppers
are not supported on the Drive port, only on the single
Motor port.
Even though we don't make it really obvious, you can drive stepper motors from the Crickit.
© Adafruit Industries
https://learn.adafruit.com/adafruit-crickit-hat-for-raspberry-pi-linux-computers
Page 45 of 87
�Stepper motors rotate all the way around but only one 'step' at a time. Usually there's a few hundred steps per turn,
making them great for precision motion. The trade off is they're very slow compared to servos or steppers. Also, unlike
servos they don't know 'where' they are in the rotation, they can only step forward and backwards.
There's two kinds of stepper motors: bipolar (4-wire) and unipolar (5 or 6-wire). We can control both kinds but with
some restrictions!
The voltage we use to power the motor is 5V only, so 5V power steppers are best, but sometimes you can drive
12V steppers at a slower/weaker rate
You can drive one bi-polar stepper motor via the Motor port
You can drive two uni-polar stepper motors, one via the Motor port and one via the Drive port
That means you have have two uni-polar steppers or one uni and one bi-polar. But you cannot drive two bi-polar
steppers.
Bi-Polar or Uni-Polar Motor Port
The Crickit Motor port can run a unipolar (5-wire and 6-wire) or bipolar (4-wire) stepper. It cannot run steppers with any
other # of wires!
The code is the same for unipolar or bipolar motors, the wiring is just slightly different.
Unlike DC motors, the wire order does matter. Connect one coil to the Motor pair #1. Connect the other coil to the
Motor pair #2
If you have a bipolar motor, connect one motor coil to #1 and the other coil to #2 and do not connect to the
center GND block.
If you are using a unipolar motor with 5 wires, connect the common wire to the center GND port.
If you are using a unipolar motor with 6 wires, you can connect the two 'center coil wires' together to the center
GND port
If you are using our "12V" bi-polar
stepper, (https://adafru.it/BxE) wire in this order: red,
yellow, (skip GND center), green, gray
© Adafruit Industries
https://learn.adafruit.com/adafruit-crickit-hat-for-raspberry-pi-linux-computers
Page 46 of 87
�If you are using our 5V uni-polar
stepper (https://adafru.it/BxF), wire in this order: orange,
pink, red (ground), yellow, blue.
Here is the CircuitPython code for stepping various ways. You can try tweaking the INTERSTEP_DELAY to slow down
the motor.
CircuitPython supports 4 different waveform stepping techniques. More on each is detailed at
Wikipedia. (https://adafru.it/BxG)
SINGLE stepping (one coil on at a time) - fast, lowest power usage, weak strength
DOUBLE stepping (two coils on at a time) - fast, highest power, high strength
INTERLEAVE stepping (alternates between one and two coils on) - slow (half the speed of single or double!),
medium power, medium strength
MICROSTEPPING - while this is supported its so slow with Crickit we're going to just 'skip' this one!
Unless you have power limiting requirements, DOUBLE is great for most projects. INTERLEAVE gives you smoother
motion but is slower. SINGLE is simplest but weakest turning strength.
© Adafruit Industries
https://learn.adafruit.com/adafruit-crickit-hat-for-raspberry-pi-linux-computers
Page 47 of 87
�import time
from adafruit_crickit import crickit
from adafruit_motor import stepper
print("Bi-Polar or Uni-Polar Stepper motor demo!")
# make stepper motor a variable to make code shorter to type!
stepper_motor = crickit.stepper_motor
# increase to slow down, decrease to speed up!
INTERSTEP_DELAY = 0.01
while True:
print("Single step")
for i in range(200):
stepper_motor.onestep(direction=stepper.FORWARD)
time.sleep(INTERSTEP_DELAY)
for i in range(200):
stepper_motor.onestep(direction=stepper.BACKWARD)
time.sleep(INTERSTEP_DELAY)
print("Double step")
for i in range(200):
stepper_motor.onestep(direction=stepper.FORWARD, style=stepper.DOUBLE)
time.sleep(INTERSTEP_DELAY)
for i in range(200):
stepper_motor.onestep(direction=stepper.BACKWARD, style=stepper.DOUBLE)
time.sleep(INTERSTEP_DELAY)
print("Interleave step")
for i in range(200):
stepper_motor.onestep(direction=stepper.FORWARD, style=stepper.INTERLEAVE)
time.sleep(INTERSTEP_DELAY)
for i in range(200):
stepper_motor.onestep(direction=stepper.BACKWARD, style=stepper.INTERLEAVE)
time.sleep(INTERSTEP_DELAY)
CircuitPython stepper motor control is pretty simple - you can access the motor port for stepper control via the
crickit.stepper_motor object (it's an adafruit_motor.stepper type object (https://adafru.it/BNE)).
With that object, you can call onestep() to step once, with the direction and stepping style included. The default
direction is FORWARD and the default style is SINGLE .
Note that 'forward' and 'backward' are, like DC motors, dependent on your wiring and coil order so you can flip around
the coil wiring if you want to change what direction 'forward' and 'backward' means.
Putting time.sleep() 's between steps will let you slow down the stepper motor, however most steppers are geared so
you may not want any delays.
Uni-Polar Only Drive Port
The Drive port can also control steppers although it can only do uni-polar! Don't try connecting a 4-wire bi-polar
stepper, it won't work at all.
© Adafruit Industries
https://learn.adafruit.com/adafruit-crickit-hat-for-raspberry-pi-linux-computers
Page 48 of 87
�If you are using our 5V uni-polar
stepper (https://adafru.it/BxF), wire in this order: red
(5V), orange, yellow, pink, blue. That should line up with
the wires on the plug
And here's the CircuitPython code. Note that the only difference is we're using the crickit.drive_stepper_motor object
now!
© Adafruit Industries
https://learn.adafruit.com/adafruit-crickit-hat-for-raspberry-pi-linux-computers
Page 49 of 87
�import time
from adafruit_crickit import crickit
from adafruit_motor import stepper
print("Uni-Polar Stepper motor demo!")
# make stepper motor a variable to make code shorter to type!
stepper_motor = crickit.drive_stepper_motor # Use the drive port
# increase to slow down, decrease to speed up!
INTERSTEP_DELAY = 0.02
while True:
print("Single step")
for i in range(200):
stepper_motor.onestep(direction=stepper.FORWARD)
time.sleep(INTERSTEP_DELAY)
for i in range(200):
stepper_motor.onestep(direction=stepper.BACKWARD)
time.sleep(INTERSTEP_DELAY)
print("Double step")
for i in range(200):
stepper_motor.onestep(direction=stepper.FORWARD, style=stepper.DOUBLE)
time.sleep(INTERSTEP_DELAY)
for i in range(200):
stepper_motor.onestep(direction=stepper.BACKWARD, style=stepper.DOUBLE)
time.sleep(INTERSTEP_DELAY)
print("Interleave step")
for i in range(200):
stepper_motor.onestep(direction=stepper.FORWARD, style=stepper.INTERLEAVE)
time.sleep(INTERSTEP_DELAY)
for i in range(200):
stepper_motor.onestep(direction=stepper.BACKWARD, style=stepper.INTERLEAVE)
time.sleep(INTERSTEP_DELAY)
© Adafruit Industries
https://learn.adafruit.com/adafruit-crickit-hat-for-raspberry-pi-linux-computers
Page 50 of 87
�CircuitPython Signals
Connecting various sensors, switches, and indicators is
easy with Crickit.
The Crickit with Circuit Playground Express is shown at
the left.
Connections to a Crickit with Feather board are
identical.
Note that if you plan to use CircuitPython, the Feather
board you choose should be one that is supported by
CircuitPython (there are a few Feathers that cannot be
programmed with CircuitPython).
The Signals block on the Crickit HAT for Raspberry Pi
gives you 8 bidirectional general purpose input/output
(GPIO) (analog/digital) ports.
Since the Crickit HAT takes pins away from the
Raspberry pi to control everything, the Signals block
helps to provide some pins back and they all can accept
analog input too (unlike RasPi pins).
You may want to add buttons, LEDs, switches or simple sensors to your robot project. With Crickit, you get 8 x 'general
purpose in/out' (GPIO) pins called signals. Each signal can be a digital input (button/switch), digital output (LED, for
© Adafruit Industries
https://learn.adafruit.com/adafruit-crickit-hat-for-raspberry-pi-linux-computers
Page 51 of 87
�example), or analog input.
This lets you add a ton of external components easily, and its all handled by seesaw. Perfect when you have a Feather
without analog inputs (like the ESP8266) or just need a ton of extra pins.
The signal pins are on a 3x8 female header, so you can poke wires directly in!
Here's an example wiring that goes with the code below.
We have two switch buttons, connected to signals #1
and #2, the other side of the buttons connect to ground
There's also two LEDs, connected to the signals #3 and
#4 and the negative wires connected to ground. (All the
3.3V and Ground pins are connected together so you
don't have to use the ones right next to the signal pin!)
© Adafruit Industries
https://learn.adafruit.com/adafruit-crickit-hat-for-raspberry-pi-linux-computers
Page 52 of 87
�import time
from adafruit_crickit import crickit
# For signal control, we'll chat directly with seesaw, use 'ss' to shorted typing!
ss = crickit.seesaw
# Two buttons are pullups, connect to ground to activate
BUTTON_1 = crickit.SIGNAL1 # button #1 connected to signal port 1 & ground
BUTTON_2 = crickit.SIGNAL2 # button #2 connected to signal port 2 & ground
ss.pin_mode(BUTTON_1, ss.INPUT_PULLUP)
ss.pin_mode(BUTTON_2, ss.INPUT_PULLUP)
# Two LEDs are outputs, on by default
LED_1 = crickit.SIGNAL3
# LED #1 connected to signal port 3 & ground
LED_2 = crickit.SIGNAL4
# LED #2 connected to signal port 4 & ground
ss.pin_mode(LED_1, ss.OUTPUT)
ss.pin_mode(LED_2, ss.OUTPUT)
ss.digital_write(LED_1, True)
ss.digital_write(LED_2, True)
while True:
if not ss.digital_read(BUTTON_1):
print("Button 1 pressed")
ss.digital_write(LED_1, True)
else:
ss.digital_write(LED_1, False)
if not ss.digital_read(BUTTON_2):
print("Button 2 pressed")
ss.digital_write(LED_2, True)
else:
ss.digital_write(LED_2, False)
Each of the 8 signal pin numbers is available under the crickit object as SIGNAL1 through SIGNAL8 . Note these are
not DigitalInOut or Pin objects! We need to use the crickit.seesaw object to set the mode, direction, and readings
To simplify our code we shorted the crickit.seesaw object to just ss
# For signal control, we'll chat directly with seesaw, use 'ss' to shorted typing!
ss = crickit.seesaw
Digital Pin Modes
You can set the mode of each signal pin with ss.pin_mode(signal, mode) where signal is the crickit.SIGNAL# from above
and mode can be ss.OUTPUT , ss.INPUT or ss.INPUT_PULLUP
ss.pin_mode(BUTTON_1, ss.INPUT_PULLUP)
ss.pin_mode(BUTTON_2, ss.INPUT_PULLUP)
...
ss.pin_mode(LED_1, ss.OUTPUT)
ss.pin_mode(LED_2, ss.OUTPUT)
© Adafruit Industries
https://learn.adafruit.com/adafruit-crickit-hat-for-raspberry-pi-linux-computers
Page 53 of 87
�Digital Read
Then, you can read the values True or False with ss.digital_read(signal)
Don't forget you have to set it to be an INPUT first!
ss.digital_read(BUTTON_1)
Digital Write
Or, you can set the signal you want to a high value with ss.digital_write(signal, True) , or set to low value with
ss.digital_write(signal, False) . Don't forget you have to set it to be an OUTPUT first!
# LED On
ss.digital_write(LED_2, True)
# LED Off
ss.digital_write(LED_2, False)
Analog Reads
You can also read analog values like from a
potentiometer or sensor.
Let's do a demonstration where the center tap of a
potentiometer is hooked up to Signal #3 - don't forget to
also connect one side of the potentiometer to 3.3V and
the other side to ground.
And here is the example code. You can see we read the signal with ss.analog_read(signal) which returns a value from 0
to 1023.
import time
from adafruit_crickit import crickit
# For signal control, we'll chat directly with seesaw, use 'ss' to shorted typing!
ss = crickit.seesaw
# potentiometer connected to signal #3
pot = crickit.SIGNAL3
while True:
print((ss.analog_read(pot),))
time.sleep(0.25)
© Adafruit Industries
https://learn.adafruit.com/adafruit-crickit-hat-for-raspberry-pi-linux-computers
Page 54 of 87
�By printing the value in a python tuple (ss.analog_read(pot),) we can use the Mu plotter to see the values immediately!
© Adafruit Industries
https://learn.adafruit.com/adafruit-crickit-hat-for-raspberry-pi-linux-computers
Page 55 of 87
�CircuitPython Touch
There's four capacitive touch pads you can use to
detect human touch. They have big pads you can use to
attach alligator/croc clips
Whether you use a Circuit Playground Crickit or Feather
Crickit, the touch pads are available.
The four capacitive touch pads on the Crickit HAT for
Raspberry pi are conveniently on the edge and vave
nice holes for clipping alligator clips onto.
You can read the value of the captouch pads from crickit.touch_#.value This will return True (if touched) or False (if
not). This is the simplest/easiest way to detect touch, but it has a catch!
© Adafruit Industries
https://learn.adafruit.com/adafruit-crickit-hat-for-raspberry-pi-linux-computers
Page 56 of 87
�We determine if the touch is active by seeing the difference between the current 'raw' reading value and the first
value. That means you do need to read the crickit touch pads without touching them first.
Try loading this code and touching the four pads while looking at the REPL
import time
from adafruit_crickit import crickit
# Capacitive touch tests
while True:
if crickit.touch_1.value:
print("Touched Cap Touch
if crickit.touch_2.value:
print("Touched Cap Touch
if crickit.touch_3.value:
print("Touched Cap Touch
if crickit.touch_4.value:
print("Touched Cap Touch
Pad 1")
Pad 2")
Pad 3")
Pad 4")
If you want to get more specific, you can read the ' raw_value ' value which is a number between 0 and 1023. Because
there's always some capacitance its reading you'll see a starting value of about 250.
You can then test against a threshold, or use it to measure how hard someone is pressing against something (a
fingertip vs a palm will give different readings)
import time
from adafruit_crickit import crickit
# Capacitive touch graphing test
touches = (crickit.touch_1, crickit.touch_2, crickit.touch_3, crickit.touch_4)
# Open up the serial Plotter in Mu to see the values graphed!
while True:
touch_raw_values = (crickit.touch_1.raw_value, crickit.touch_2.raw_value,
crickit.touch_3.raw_value, crickit.touch_4.raw_value)
print(touch_raw_values)
time.sleep(0.1)
© Adafruit Industries
https://learn.adafruit.com/adafruit-crickit-hat-for-raspberry-pi-linux-computers
Page 57 of 87
�© Adafruit Industries
https://learn.adafruit.com/adafruit-crickit-hat-for-raspberry-pi-linux-computers
Page 58 of 87
�CircuitPython NeoPixels
You can connect any type of NeoPixels to the NeoPixel
port on the Crickit for Circuit Playground Express. Be
sure you connect the Power and Ground connections
appropriately.
The center arrow terminal on Crickit NeoPixel block is
connected to Din on the first NeoPixel or the beginning
of a strip of NeoPixels.
Likewise the Crickit Feather WIng has the same
NeoPixel block.
The board is just rotated a bit from the above picture,
same location).
The Crickit HAT for Raspberry Pi has the NeoPixel block
along the edge for easy wiring.
Using NeoPixels in your Crickit project is easy and fun, providing a dedicated port on the Crickit to directly wire
NeoPixels easily.
© Adafruit Industries
https://learn.adafruit.com/adafruit-crickit-hat-for-raspberry-pi-linux-computers
Page 59 of 87
�The sample code for using NeoPixels on the Crickit vary slightly depending on which version of Crickit you have. Look
for the appropriate section on this page for your combination of Crickit and microcontroller.
Crickit and Circuit Playground Express
If you are looking to use the NeoPixels on the Circuit Playground Express board itself, Adafruit has several
tutorials that program them with CircuitPython. See Make It Glow with Crickit for details.
The NeoPixel terminal block is controlled by the Circuit Playground Express pad A1. The pad A1 definition is obtained
by import board . Then the NeoPixel routine is from import neopixel .
Various animations are provided by def ined functions wheel , color_chase and rainbow_cycle . Various solid colors are
then defined, you are free to use whichever colors you wish.
You can define a new color variable as a Python tuple with three values for red, green, blue, for example WHITE = (255,
255, 255) .
# Drive NeoPixels on the NeoPixels Block on Crickit for
# Circuit Playground Express
import time
import neopixel
import board
num_pixels = 30
# Number of pixels driven from Crickit NeoPixel terminal
# The following line sets up a NeoPixel strip on Crickit CPX pin A1
pixels = neopixel.NeoPixel(board.A1, num_pixels, brightness=0.3,
auto_write=False)
def wheel(pos):
# Input a value 0 to 255 to get a color value.
# The colours are a transition r - g - b - back to r.
if pos < 0 or pos > 255:
return (0, 0, 0)
if pos < 85:
return (255 - pos * 3, pos * 3, 0)
if pos < 170:
pos -= 85
return (0, 255 - pos * 3, pos * 3)
pos -= 170
return (pos * 3, 0, 255 - pos * 3)
def color_chase(color, wait):
for i in range(num_pixels):
pixels[i] = color
time.sleep(wait)
pixels.show()
time.sleep(0.5)
def rainbow_cycle(wait):
for j in range(255):
for i in range(num_pixels):
rc_index = (i * 256 // num_pixels) + j
pixels[i] = wheel(rc_index & 255)
pixels.show()
© Adafruit Industries
https://learn.adafruit.com/adafruit-crickit-hat-for-raspberry-pi-linux-computers
Page 60 of 87
�pixels.show()
time.sleep(wait)
RED = (255, 0, 0)
YELLOW = (255, 150, 0)
GREEN = (0, 255, 0)
CYAN = (0, 255, 255)
BLUE = (0, 0, 255)
PURPLE = (180, 0, 255)
while True:
print("fill")
pixels.fill(RED)
pixels.show()
# Increase or decrease to change the speed of the solid color change.
time.sleep(1)
pixels.fill(GREEN)
pixels.show()
time.sleep(1)
pixels.fill(BLUE)
pixels.show()
time.sleep(1)
print("chase")
color_chase(RED, 0.1) # Increase the number to slow down the color chase
color_chase(YELLOW, 0.1)
color_chase(GREEN, 0.1)
color_chase(CYAN, 0.1)
color_chase(BLUE, 0.1)
color_chase(PURPLE, 0.1)
print("rainbow")
rainbow_cycle(0)
# Increase the number to slow down the rainbow
Crickit and the Crickit FeatherWing
The NeoPixel block signal wire is connected to the Crickit Seesaw control chip pin #20. The following code sets up an
external 30 NeoPixel strip connected to the Crickit FeatherWing.
# Drive NeoPixels on the NeoPixels Block on Crickit FeatherWing
import time
from adafruit_crickit import crickit
from adafruit_seesaw.neopixel import NeoPixel
num_pixels = 30
# Number of pixels driven from Crickit NeoPixel terminal
# The following line sets up a NeoPixel strip on Seesaw pin 20 for Feather
pixels = NeoPixel(crickit.seesaw, 20, num_pixels)
def wheel(pos):
# Input a value 0
# The colours are
if pos < 0 or pos
return (0, 0,
if pos < 85:
return (255 if pos < 170:
pos -= 85
© Adafruit Industries
to 255 to get a color value.
a transition r - g - b - back to r.
> 255:
0)
pos * 3, pos * 3, 0)
https://learn.adafruit.com/adafruit-crickit-hat-for-raspberry-pi-linux-computers
Page 61 of 87
�pos -= 85
return (0, 255 - pos * 3, pos * 3)
pos -= 170
return (pos * 3, 0, 255 - pos * 3)
def color_chase(color, wait):
for i in range(num_pixels):
pixels[i] = color
time.sleep(wait)
pixels.show()
time.sleep(0.5)
def rainbow_cycle(wait):
for j in range(255):
for i in range(num_pixels):
rc_index = (i * 256 // num_pixels) + j
pixels[i] = wheel(rc_index & 255)
pixels.show()
time.sleep(wait)
RED = (255, 0, 0)
YELLOW = (255, 150, 0)
GREEN = (0, 255, 0)
CYAN = (0, 255, 255)
BLUE = (0, 0, 255)
PURPLE = (180, 0, 255)
while True:
print("fill")
pixels.fill(RED)
pixels.show()
# Increase or decrease to change the speed of the solid color change.
time.sleep(1)
pixels.fill(GREEN)
pixels.show()
time.sleep(1)
pixels.fill(BLUE)
pixels.show()
time.sleep(1)
print("chase")
color_chase(RED, 0.1) # Increase the number to slow down the color chase
color_chase(YELLOW, 0.1)
color_chase(GREEN, 0.1)
color_chase(CYAN, 0.1)
color_chase(BLUE, 0.1)
color_chase(PURPLE, 0.1)
print("rainbow")
rainbow_cycle(0)
# Increase the number to slow down the rainbow
Crickit for micro:bit
Currently the micro:bit is not supported in CircuitPython. The micro:bit is programmable in MicroPython but there is no
Crickit drive support for MicroPython at present.
For More Information
© Adafruit Industries
https://learn.adafruit.com/adafruit-crickit-hat-for-raspberry-pi-linux-computers
Page 62 of 87
�For More Information
See the tutorial Make It Glow with Crickit (https://adafru.it/Cxx).
© Adafruit Industries
https://learn.adafruit.com/adafruit-crickit-hat-for-raspberry-pi-linux-computers
Page 63 of 87
�Python Docs
Python Docs (https://adafru.it/CAJ)
© Adafruit Industries
https://learn.adafruit.com/adafruit-crickit-hat-for-raspberry-pi-linux-computers
Page 64 of 87
�Recommended Motors
DC Gearbox Motors
These DC motors have a gear box already built in, and wires attached, so they're super easy to use:
DC Gearbox Motor - "TT Motor" - 200RPM - 3 to 6VDC
$2.95
IN STOCK
ADD TO CART
We also have a wide range of matching wheels:
Orange and Clear TT Motor Wheel for TT DC Gearbox
Motor
$1.50
IN STOCK
ADD TO CART
Thin White Wheel for TT DC Gearbox Motors - 65mm
Diameter
$1.50
IN STOCK
ADD TO CART
© Adafruit Industries
https://learn.adafruit.com/adafruit-crickit-hat-for-raspberry-pi-linux-computers
Page 65 of 87
�Skinny Wheel for TT DC Gearbox Motors
$2.50
IN STOCK
ADD TO CART
Other accessories are available, check the Adafruit shop for "TT Motor" items (https://adafru.it/Bfn) for the wide
range of add-ons available.
Servo-style DC motor
If you need a motor that is very compact (but not very powerful) these DC-in-servo-body motors can do the job:
DC Motor in Micro Servo Body
$3.50
IN STOCK
ADD TO CART
Which can be used with this wheel:
Wheel for Micro Continuous Rotation FS90R Servo
$2.50
IN STOCK
ADD TO CART
Non-Geared DC Motor
Non-geared DC motors are very weak but very fast: great for fans:
© Adafruit Industries
https://learn.adafruit.com/adafruit-crickit-hat-for-raspberry-pi-linux-computers
Page 66 of 87
�DC Toy / Hobby Motor - 130 Size
$1.95
IN STOCK
ADD TO CART
© Adafruit Industries
https://learn.adafruit.com/adafruit-crickit-hat-for-raspberry-pi-linux-computers
Page 67 of 87
�Recommended Chassis
This chassis is cute, red and has two DC motors so its super easy to drive from the Crickit's dual DC motor port. You
may need to use some wires to extend the DC motor connections (they're a tad short)
Your browser does not support the video tag.
Mini Round Robot Chassis Kit - 2WD with DC Motors
$19.95
IN STOCK
ADD TO CART
This chassis is nearly identical, but has 3 layers, so you can FIT MORE STUFF!
Mini 3-Layer Round Robot Chassis Kit - 2WD with DC
Motors
$24.95
IN STOCK
ADD TO CART
This chassis is not as nice as the above, but if you fancy it, it comes with two servo-style DC motors and can use the
DC motor control on the Crickit as well
Your browser does not support the video tag.
Mini Robot Rover Chassis Kit - 2WD with DC Motors
$24.95
IN STOCK
ADD TO CART
© Adafruit Industries
https://learn.adafruit.com/adafruit-crickit-hat-for-raspberry-pi-linux-computers
Page 68 of 87
�Recommended Servos
You're in luck, you can use just about any kind of servo!
Note that many of the photos below don't show the additional motor horns, but every servo comes with plastic clipon parts!
Servo Extensions
People often ask us what they can do if the wire to their Servo is to short for their project. Not a problem! These cables
act as extension cords - now you've got plenty of room.
Servo Extension Cable - 30cm / 12" long -
$1.95
IN STOCK
ADD TO CART
© Adafruit Industries
https://learn.adafruit.com/adafruit-crickit-hat-for-raspberry-pi-linux-computers
Page 69 of 87
�Servo Extension Cable - 50cm / 19.5" long
$2.50
IN STOCK
ADD TO CART
Popular plastic-gear servos
The most popular/common servos have plastic gears, they're plenty strong and not too expensive!
These can go back and forth, rotating about 180 degrees
They come in 'standard' size:
Standard servo - TowerPro SG-5010
$12.00
IN STOCK
ADD TO CART
And 'micro' size, not as strong but much more compact
Micro servo
$5.95
IN STOCK
ADD TO CART
Continuous Rotation Servos
These servos look a lot like the above but they rotate all the way around . Unlike standard servos you can't control the
© Adafruit Industries
https://learn.adafruit.com/adafruit-crickit-hat-for-raspberry-pi-linux-computers
Page 70 of 87
�location of the horn, just the speed and direction it which it turns. Good as an alternative to DC motors for wheeled
bots. For that reason, they tend to get purchased with matching wheels!
Continuous Rotation Servo
$11.95
IN STOCK
ADD TO CART
Continuous Rotation Servo Wheel
$2.95
IN STOCK
ADD TO CART
Your browser does not support the video tag.
Continuous Rotation Micro Servo
$7.50
IN STOCK
ADD TO CART
© Adafruit Industries
https://learn.adafruit.com/adafruit-crickit-hat-for-raspberry-pi-linux-computers
Page 71 of 87
�Wheel for Micro Continuous Rotation FS90R Servo
$2.50
IN STOCK
ADD TO CART
High Torque Servos
If you need more power, metal-gear servos can give you better torque, but at additional cost (since the gears have to
be machined)
These are not continuous rotation
Standard Size - High Torque - Metal Gear Servo
$19.95
IN STOCK
ADD TO CART
Micro Servo - High Powered, High Torque Metal Gear
$11.95
IN STOCK
ADD TO CART
© Adafruit Industries
https://learn.adafruit.com/adafruit-crickit-hat-for-raspberry-pi-linux-computers
Page 72 of 87
�Micro Servo - MG90D High Torque Metal Gear
$9.95
IN STOCK
ADD TO CART
© Adafruit Industries
https://learn.adafruit.com/adafruit-crickit-hat-for-raspberry-pi-linux-computers
Page 73 of 87
�Recommended Speakers
The Class-D amplifier on the Crickit is pretty powerful, so you can make quite a bit of noise!
4Ω Speakers
You'll get a lot louder audio from 4Ω speakers.
We recommend this speaker, you'll have to either poke wires into the connector, or cut it off and strip the wires to
connect to the terminal block, but its nice and durable
Mono Enclosed Speaker - 3W 4 Ohm
$3.95
IN STOCK
ADD TO CART
This speaker is less expensive but you'll need to solder wires to the back
Speaker - 3" Diameter - 4 Ohm 3 Watt
$1.95
IN STOCK
ADD TO CART
8Ω Speakers
8 ohm speakers won't be as loud, but that's OK!
This speaker is inexpensive, but you'll need to solder wires to the back
© Adafruit Industries
https://learn.adafruit.com/adafruit-crickit-hat-for-raspberry-pi-linux-computers
Page 74 of 87
�Speaker - 3" Diameter - 8 Ohm 1 Watt
$1.95
IN STOCK
ADD TO CART
The speakers below work just fine, but because the audio amp is pretty strong so you have to make sure not to
damage the speakers by turning up the potentiometer on the Crickit to make the audio really loud.
If you're getting buzzy sounds from them, turn that little trimmer potentiometer down.
Mini Metal Speaker w/ Wires - 8 ohm 0.5W
$1.95
IN STOCK
ADD TO CART
Thin Plastic Speaker w/Wires - 8 ohm 0.25W
$1.75
OUT OF STOCK
OUT OF STOCK
Wall or Bone Transducers
You can also use surface transducers if you like; attach/bolt/clamp the transducer to a surface:
© Adafruit Industries
https://learn.adafruit.com/adafruit-crickit-hat-for-raspberry-pi-linux-computers
Page 75 of 87
�Medium Surface Transducer with Wires - 4 Ohm 3 Watt
$14.95
IN STOCK
ADD TO CART
Bone Conductor Transducer with Wires - 8 Ohm 1 Watt
$8.95
OUT OF STOCK
OUT OF STOCK
© Adafruit Industries
https://learn.adafruit.com/adafruit-crickit-hat-for-raspberry-pi-linux-computers
Page 76 of 87
�Recommended Drives
Solenoids
Since the Crickit can only drive 5V power, you'll need to stick to this small 5V solenoid
Your browser does not support the video tag.
Mini Push-Pull Solenoid - 5V
$4.95
OUT OF STOCK
OUT OF STOCK
Vibration Motors
You'll need to extend these wires but they'll work great at 5V and buzz very strongly
Vibrating Mini Motor Disc
$1.95
IN STOCK
ADD TO CART
© Adafruit Industries
https://learn.adafruit.com/adafruit-crickit-hat-for-raspberry-pi-linux-computers
Page 77 of 87
�Recommended Capacitive Touch
The capacitive touch pads on the Crickit have large holes so its easy to connect alligator/croc clips. That's how we
recommend you attach to them. The "small" size clips work best:
Small Alligator Clip Test Lead (set of 12)
$3.95
IN STOCK
ADD TO CART
Small Alligator Clip to Male Jumper Wire Bundle - 6 Pieces
$3.95
IN STOCK
ADD TO CART
You can also use copper foil tape. Note that if you get foil with conductive adhesive, you can tape the foil right onto the
Crickit pads. Otherwise you'll need to use alligator clips to grab onto the copper.
Copper Foil Tape with Conductive Adhesive - 6mm x 15
meter roll
$5.95
IN STOCK
ADD TO CART
© Adafruit Industries
https://learn.adafruit.com/adafruit-crickit-hat-for-raspberry-pi-linux-computers
Page 78 of 87
�Copper Foil Tape with Conductive Adhesive - 25mm x 15
meter roll
$19.95
IN STOCK
ADD TO CART
You can use other conductive materials like paints! Either drip the paint into the pad itself and let it harden, or use
alligator clips to connect from one pad to a paper with conductive paint on it.
Bare Conductive Paint Pen - 10mL
$9.95
IN STOCK
ADD TO CART
Bare Conductive Paint - 50mL
$29.95
IN STOCK
ADD TO CART
Remember: If you absolutely need more capacitive touch pins, Signal #1, #2, #3, #4 are four more capacitive touch
inputs.
© Adafruit Industries
https://learn.adafruit.com/adafruit-crickit-hat-for-raspberry-pi-linux-computers
Page 79 of 87
�Hacks & Upgrades
Brown Outs?
The power supply on the Crickit will let you draw 4 Amps at once, which is a lot. But perhaps you are turning on all the
motors at once, causing the power supply to flicker? An extra large capacitor on the 5V and GND pads may help
smooth out that power draw!
Use a large electrolytic capacitor, rated for 10V or higher. Even though the power supply is 5V, you may think you can
use a 6.3V capacitor, but you want at least 2x the voltage rating if possible so stick to 10V!
4700uF 10v Electrolytic Capacitor
$1.95
IN STOCK
ADD TO CART
Connect the capacitor using the NeoPixel terminal blocks. The 5V and GND lines are shared across the board so even
if its a DC motor or servo causing the issues, this will help! It's just the most convenient place to attach a large
capacitor because the two terminal blocks are nicely spaced.
Connect the capacitor using the NeoPixel terminal
blocks. The 5V and GND lines are shared across the
board so even if its a DC motor or servo causing the
issues, this will help!
Connect the Positive (longer leg) to 5V and the
Negative (shorter leg) to GND
© Adafruit Industries
https://learn.adafruit.com/adafruit-crickit-hat-for-raspberry-pi-linux-computers
Page 80 of 87
�F.A.Q.
Why did you misspell "Cricket"?
We wanted a unique name, inspired by the original Cricket robotics platform from MIT (which then became the
PicoCricket), but not with the exact same name!
© Adafruit Industries
https://learn.adafruit.com/adafruit-crickit-hat-for-raspberry-pi-linux-computers
Page 81 of 87
�Troubleshooting Crickit
Your Crickit is well tested but there's things that can trip you up! Here's a few common issues we see
My Crickit Is Doing Something Wrong
We do have bugs once in a while, so please always try updating to the latest Crickit seesaw
firmware (https://adafru.it/BMV) - then see if the bug persists
My Crickit Motors Aren't Moving!
My Crickit Keeps Resetting, It Works For a Bit... Then Fails!
Check the power supply. There's a few ways to know that power is good:
1. Check the "Happy Face" green LED below the power switch, it should stay lit!
2. Check the "Warning Symbol" red LED below the power switch, it should be off
If you have updated the Crickit seesaw firmware (see
above) we have added NeoPixel feedback, the LED will
be green when power is good and blink red when
power is bad!
HELP! My Crickit isn't working in MakeCode, and in Python I see a message "No I2C
Device at Address: 49"
A super common issue we see is people using the Crickit with Circuit Playground Express (CPX) and the bolts/screws
have come loose! Those bolts aren't just mechanical, they pass signals back and forth between the CPX and the
Crickit!
If you're having issue, first thing to check is that those screws are tightly attached!
© Adafruit Industries
https://learn.adafruit.com/adafruit-crickit-hat-for-raspberry-pi-linux-computers
Page 82 of 87
�Another common issue we see is not having good power to the Crickit. Check that you have fresh batteries or a good
5V power supply. Also check the Crickit is on! There's an on/off switch next to the power jack
Python: No Pullups found on SDL and SCL
If you're running Crickit on battery power, you need fresh batteries (or you can use the wall power brick to provide
power).
If batteries aren't an issue, try clicking reset on the Crickit board to kick it back into running
micro:bit Crickit does not work
Be sure the micro:bit LED matrix faces towards the Crickit Seesaw chip and USB firmware update plug and the
micro:bit reset button faces the Crickit black power jack. If you plug the micro:bit in backwards, it won't control things
properly. Unplug the micro:bit, make sure the 5x5 grid of LEDs faces the Crickit printing that says "micro:bit LED grid
faces this way" and you should be set.
© Adafruit Industries
https://learn.adafruit.com/adafruit-crickit-hat-for-raspberry-pi-linux-computers
Page 83 of 87
�Downloads
Files
PCB Files on GitHub (https://adafru.it/BEj)
Fritzing objects in Adafruit Fritzing Library (https://adafru.it/aP3)
Datasheets
TPS259573 eFuse power supply protection chip (https://adafru.it/Bfj)
DRV8833 DC motor driver chip (https://adafru.it/Bfk)
ULN2003A Darlington driver chip (https://adafru.it/Bfl)
Circuit Playground Crickit Schematics
Click to embiggen
© Adafruit Industries
https://learn.adafruit.com/adafruit-crickit-hat-for-raspberry-pi-linux-computers
Page 84 of 87
�Crickit HAT Schematics
© Adafruit Industries
https://learn.adafruit.com/adafruit-crickit-hat-for-raspberry-pi-linux-computers
Page 85 of 87
�© Adafruit Industries
https://learn.adafruit.com/adafruit-crickit-hat-for-raspberry-pi-linux-computers
Page 86 of 87
�
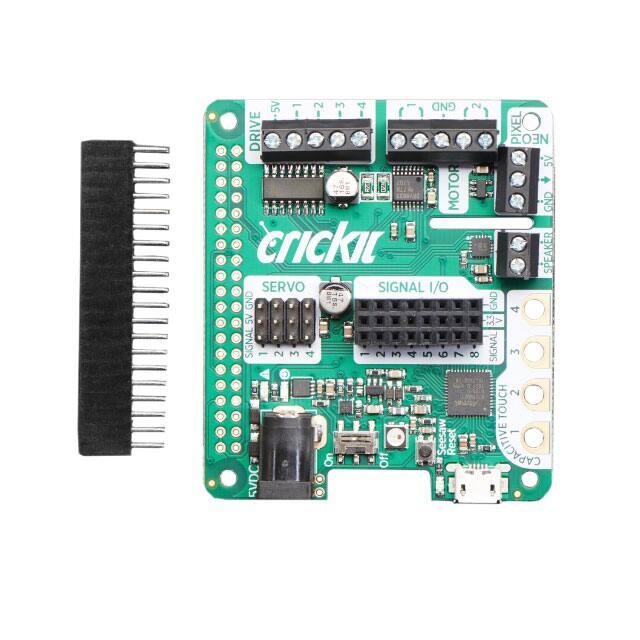


 工商网监
湘ICP备2023018690号
工商网监
湘ICP备2023018690号
