Bluno M3 SKU:DFR0329
Bluno M3
Contents
1 Overview
2 Specification
3 Board Overview
4 Bluno M3 Features
4.1 Differences between Bluno M3 and Arduino
5 QuickStart
5.1 Setup Software Development Environment
5.2 Install Bluno M3 Driver
5.3 Blink an LED
5.4 Wireless Programming
Overview
The ARM processor is famous for its efficient processing performance, but one of the downsides to
this is that its developing environment is also quite complicated. Bluno M3, a new product designed
by DFRobot, changes this. The rewritten underlying protocol and development environment have
been rewritten to accommodate for Arduino language usage, giving it full Arduino compatibility.
Bluno M3 has 512K flash memory and 64K SRAM, and the integrated Bluetooth 4.0 (BLE) supports
Bluetooth wireless control or Bluetooth wireless programming. This board is suitable for robotic
control or IOT applications and has a good balance between Arduino and ARM processing.
�Specification
Microcontroller: STM32 F103RET6
Clock Speed: 72MHz
Bluetooth chip: TI CC2540 (Bluetooth 4.0)
Communication Range: 30m
Operating Voltage: 3.3V
DC Supply: USB Powered or External 7V~12V DC
Digital I/O Pins: 39
Analog Input Pins: 11 (Multiplexing Pins)
External Interrupt: 39 (D0~D38)
I2C/IWC: 30 (Default SDA), 29 (Default SCL)
SRAM: 64K
Flash: 512K (Customizable Flash assignment, refer to Flash chapter)
Default User Code repository: 492K
Default User Data repository: 20K
SPI: SPI,SPI1
SPI 12(MISO), 11(MOSI), 13(SCK)
SPI1 33(MISO), 34(MOSI), 32(SCK)
Serial Port: 5 (Serial1/Serial2/Serial3/Serial4/Serial5)
Serial1 0 (Rx1) & 1(Tx1)
Serial2 22(Rx2) & 21(Tx2)
Serial3 30(Rx3) & 29(Tx3)
Serial4 8(Rx4) & 9(Tx4)
Serial5 54(Rx5) & 53(Tx5)
Dimensions: 68mm x 31mm
The STM32 is a 3.3V processor. Do NOT use any 5V sensor/module with it in case of
burning it!
Board Overview
�
M3 Hardware UART1 connects to RX1/TX1 and Bluetooth communications port
SCL/SDA is a default internal IIC interface, compatible with Arduino IIC use-pattern
"~": PWM: pins with this mark can output a PWM signal (refer to PWM chapter for more
information)
"Ax": Analog input pins (note: some analog pins and digital pins are using the same GPIO)
"SWD": STM32 debug port
For pin definitions and functions refer to the MORE section: Bluno M3 Reference manual ——
GPIO
https://www.dfrobot.com/wiki/index.php/Bluno_M3_Reference_Manual#GPIO
Bluno M3 Features
Differences between Bluno M3 and Arduino
1. Overview
The Bluno M3 is different to previous Bluno boards as it is based on a 32bit ARM Cortex-M3
core architecture. A regular Arduino is based on an 8bit AVR core. Due to these differences,
machine commands are also different. Arduino IDE uses avr-gcc, whilst Bluno M3 uses armnone-eabi-gcc.
2. Hardware Ports
ADC: Pins marked with "Ax" (e.g. A0, A6, A10) can be used as Analog input ports
Uart: 5 Serial Ports in all (Serial1/Serial2/Serial3/Serial4/Serial5). Bluetooth and RX1/TX1 use
Serial1
SWD: STM32 debug port, you can use debug hardware based on STM32 on these pins
GPIO: All pins can be used as digital I/O, including analog pins
3. Language and Library Software Differences
ADC: Bluno M3 provides two kinds of ADC mode: one is compatible with Arduino, the other is
Bluno M3's unique way: adcMode() and adcRead(), which makes it more powerful. Refer to
Bluno M3 Bluno M3 Reference manual —— ADC ADC Application.
PWM: Bluno M3 provides two kinds of PWM mode, one is compatible with Arduino, the other is
Bluno M3's unique way: pwmMode() and pwmWrite(),which makes it more powerful. Please
refer to Bluno M3 Bluno M3 Reference manual —— PWM PWM Application.
UART: There are 5 UARTs on the board. UART1 is corresponds to the Board RX1 and TX1, and
it is also connected with the Bluetooth communicating port.
4. Bluno M3 Reference
This section introduces basic information, methods of application, function interfaces and uses.
e.g. GPIO, PWM, UART, SPI, I2C, etc. For the further information, please check Bluno M3
Reference Manual
https://www.dfrobot.com/wiki/index.php/Bluno_M3_Reference_Manual
�QuickStart
In this section, we will guide you how to use Bluno M3 step by step.
Setup Software Development Environment
1. Download IDE and Bluno M3 Driver
Download Bluno M3 Arduino IDE —— Arduino IDE 1.5.5 (M3 Version) from OneDrive
https://onedrive.live.com/redir?resid=7B63697962CC93EA!133&authkey=!AEO3Nnxvjvxcmtk&ithint=
folder%2cpdf
This is a custom version based on Arduino IDE 1.5.5 where we have redefined the interface
functions. Please note that because of this, other versions are not compatible with Bluno M3.
2. Install Software
Download Arduino IDE (Bluno M3 version) and extract the files to your computer.
Configure Environment Variables
1. Open Control Panel > System and Security > System > Advanced System Settings >
Environment Variables
2. Select PATH, and click Edit... button
�3. Copy the Arduino IDE 1.5.5 (Bluno M3 Version) directory path you downloaded before in
to PATH. For example: C:\Arduino\hardware\tools\avr\utils\bin. Click OK.
Note: If there are a lot of directories in PATH, you can use ";"(semicolon) to split them.
�Install Bluno M3 Driver
1. Connect Bluno M3 to your PC's USB port, open Hardware Devices and select the Driver
folder.
Note: The Driver folder is located in your Arduino IDE 1.5.5 (Bluno M3 version) hardware
drivers folder.
e.g. C:\Arduino\hardware\drivers
Blink an LED
1) Open Arduino IDE 1.5.5 (Bluno M3 Version)
2) Select "Bluno M3" and COM port
�3) Click "Files" > "Examples" > "0.1 Basic" > "Blink" to open the samp
le code "Blink".
4) Click "Upload" to upload the sketch to the device.
You should see the on-board LED flashing on and off every second.
�Wireless Programming
Bluno M3 is a derivative of the Bluno microcontroller, as a result it inherits wireless
programming and wireless communication functions. You can refer to the Bluno wiki page
for Bluetooth configuration and the AT commend set.
Bluno Wiki Page
Some recommendations:
Port
PCBluno M3
BlunoBluno M3
ArduinoBluno M3
Bluno M3
USB BLE Link Bluno M3
Direct-connect Bluno M3
BLE Link Bluno M3
Just configure one PERIPHERAL, the another CENTRAL. They will automatically
connect.
For any question/advice/cool idea to share, please visit DFRobot Forum.
Powered By DFRobot © 2008-2017
�
很抱歉,暂时无法提供与“DFR0329”相匹配的价格&库存,您可以联系我们找货
免费人工找货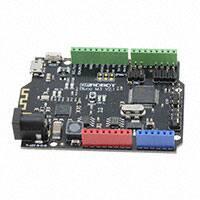


 工商网监
湘ICP备2023018690号
工商网监
湘ICP备2023018690号
